White
White
 Pink
Pink
 Red
Red
 Orange
 Ivory
Ivory
 Yellow
 Gold
Gold
 Brown
Brown
 Green
Green
 Blue
Blue
 Purple
 Grey
Grey
 Black
Black
 Multi
Multi
 Abstract
 African Print
 Animal Print
 Baby & Nursery
 Buffalo Check
 Camo Print
 Celestial
 Church
 Damask
 Embroidered
 Floral
 Geometric
 Gingham Check
 Houndstooth
 Licensed
 Paisley
 Plaid
Plaid
 Polka Dot
 Sports
 Stripe
 Tie Dye

A DIY Stranger Things Inspired "Robin" Halloween Costume Sewing Tutorial
One of the most popular, and most Halloween worthy, Netflix original series is Stranger Things. The characters are dynamic and original, and in the latest season we were introduced to a new character named Robin. She works in an ice cream shop with heart throb Steve Harrington. Throughout the entire season, she is pictured wearing her ice cream shop uniform, thus making it the perfect Halloween costume!
The uniform is made up of four major components: a striped tee shirt, blue shorts, blue vest, and white collar with a red bow. In order to shorten the DIY process, this tutorial will show you how to make the vest and shorts from royal blue fabric and the collar from white and red fabric. The shirt was purchased on Amazon and cut to size. A great time saver on this project is buying bias tape to create the stripes on the shorts and the collar instead of making the stripes out of fabric.
To put together the entire look, you will create the collar and attach it to your shirt. The vest will then layer over the tee shirt and the tee shirt will tuck into the shorts. Some details on Robin's outfit that can also be added include an ice cream emblem, name tag, Ahoy hat, socks, and red converse shoes.
Supplies:
- 2 yards Royal Blue Cotton Jersey fabric
- 1 yard White Cotton Jersey fabric
- 1/4 yard Red Cotton Jersey fabric
- Blue and White Striped Tee Shirt
- 3 yards White 7/8" Wide Double Fold Binding Bias Tape
- 3 yards Red 1/2" Wide Double Fold Binding Bias Tape
- 2" Wide Elastic as long as your waist measurement
- Red, White, and Blue Thread
- Sewing Machine
- Pins
- Scissors
- Measuring Tape
Time:
6-8 hours
Difficulty:
Easy
- Start by cutting out all of the pattern pieces needed. You will have two SHORTS BACK pieces, 2 SHORTS FRONT pieces, 4 VEST FRONT pieces, 2 VEST BACK pieces, 2 COLLAR pieces, and 2 BOW pieces. You will also need 1/2" red bias tape for the collar, 7/8" white bias tape for the shorts, and 2" wide elastic for the shorts. The COLLAR piece can be made using a v-neck shirt as a guide to get the curve right.

- SHORTS: Take your each of your SHORTS FRONT pieces and pin them to the SHORTS BACK pieces at the sides. Sew along the sides.


- SHORTS: Turn one of the legs of the shorts right side out and place it inside of the other leg of the shorts. Line up the inseam and pin them together. Sew along the inseam. Turn the shorts inside out.


- SHORTS: Fold the waistband of the shorts down 2.5" and pin in place. Sew along the waist 2.25" from the edge of the fabric leaving a 2.5" gap at the back of the shorts not sewn. Slide your elastic through the waistband hole until it comes out the other side. Sew the elastic together with a zig-zag stitch, tuck into the waistband, and sew closed the waistband hole.

- SHORTS: Fold up the hem of the shorts 1/2", pin, and sew. Take you white 7/8" bias tape and pin it to the bottom edge of the shorts with about 3/8" of blue fabric showing. Sew along the top and bottom edge of the bias tape to attach it to the shorts, overlapping a small amount of bias tape at the ends. Repeat this step with another stripe 3/8" above the other one to complete the shorts.


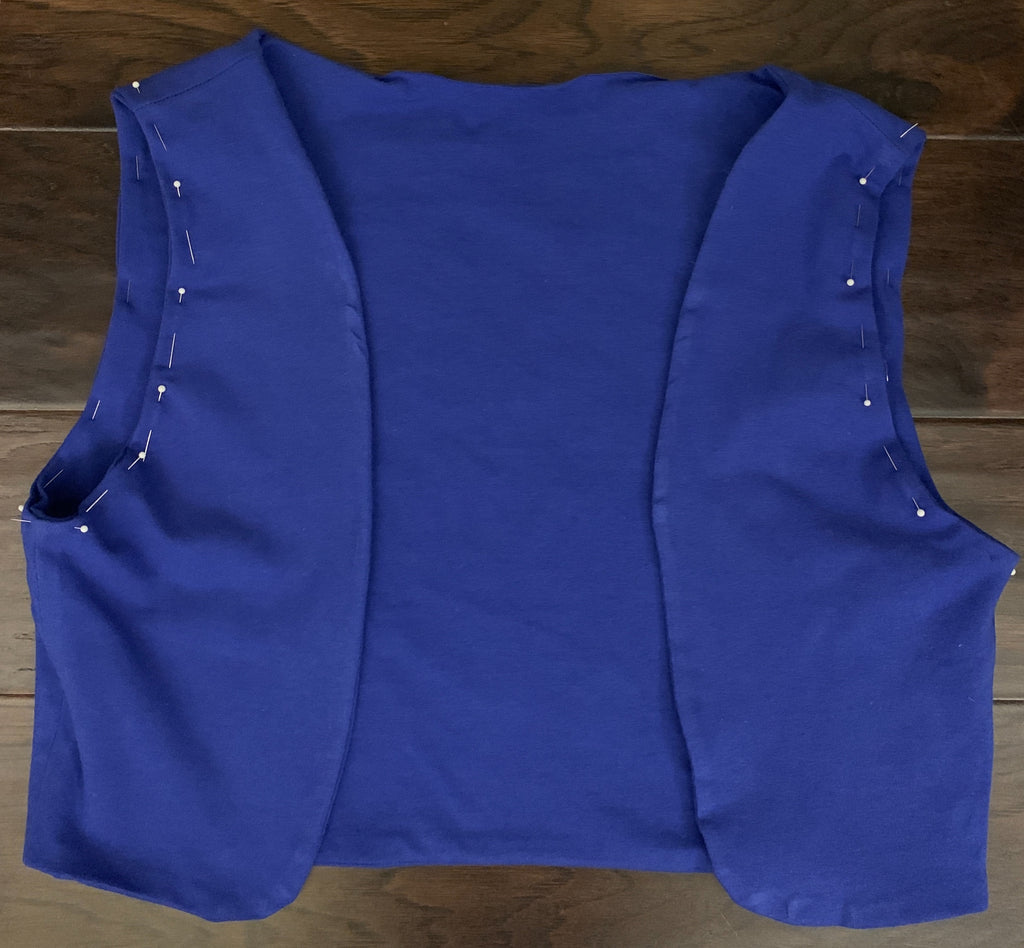
- VEST: Take 2 of your VEST FRONT pieces and line them up with your VEST BACK piece and pin together the sides and shoulders. Sew them together and repeat on the other set of vest pieces.

- VEST: Lay one vest down with the right side of the fabric facing up and lay the other vest on top with the wrong side of the fabric facing up. Pin together all of the outside edges of the vest except at the neck. Sew the pieces together about 1/4" from the edge of the fabric. Turn the vest right side out.

- VEST: Roll the edges of the arm holes to the inside of the vest lining about 1/4" and pin the two layers together. Sew along the arm holes to close them.
- COLLAR: Line up both COLLAR pieces on top of one another. Pin along the edges of the collar and back of the collar to connect them and sew together, leaving the round section open. Turn the collar right side out

- COLLAR: Take your 1/2" red bias tape and pin it to the edge of the collar where you sewed before, leaving about 3/8" of white fabric showing at the edge. Sew along both sides of the bias tape to connect it to the collar.

- BOW: Line up both BOW pieces on top of one another. Pin along the edges of the bow and sew to connect them, leaving a 2" opening at the center of the bow. Turn the bow right side out, and tie it in a knot at the center.


- ASSEMBLY: To assemble the costume, take your shirt and turn it inside out. Line up the collar with the right side of the collar facing the wrong side of the fabric of the shirt. Pin the collar down around the edges and sew 3/8" from the edge of the fabric to connect them. Turn the shirt right side out and flip the collar to the outside. Place the bow in the center of the collar and hand sew the knot down to the shirt.


- WEAR: Put on the shirt with collar attached. Put on the vest, making sure the collar stays on the outside of the vest. Pull on the shorts and tuck the shirt in. Add a name tag and ice cream emblem if desired! You're all set now!


This Tutorial was created by Julia Bleck of Bunny Baubles Blog