 White
White
 Pink
Pink
 Red
Red
 Orange
 Ivory
Ivory
 Yellow
 Gold
Gold
 Brown
Brown
 Green
Green
 Blue
Blue
 Purple
 Grey
Grey
 Black
Black
 Multi
Multi
 Abstract
 African Print
 Animal Print
 Baby & Nursery
 Buffalo Check
 Camo Print
 Celestial
 Church
 Damask
 Embroidered
 Floral
 Geometric
 Gingham Check
 Houndstooth
 Licensed
 Paisley
 Plaid
Plaid
 Polka Dot
 Sports
 Stripe
 Tie Dye
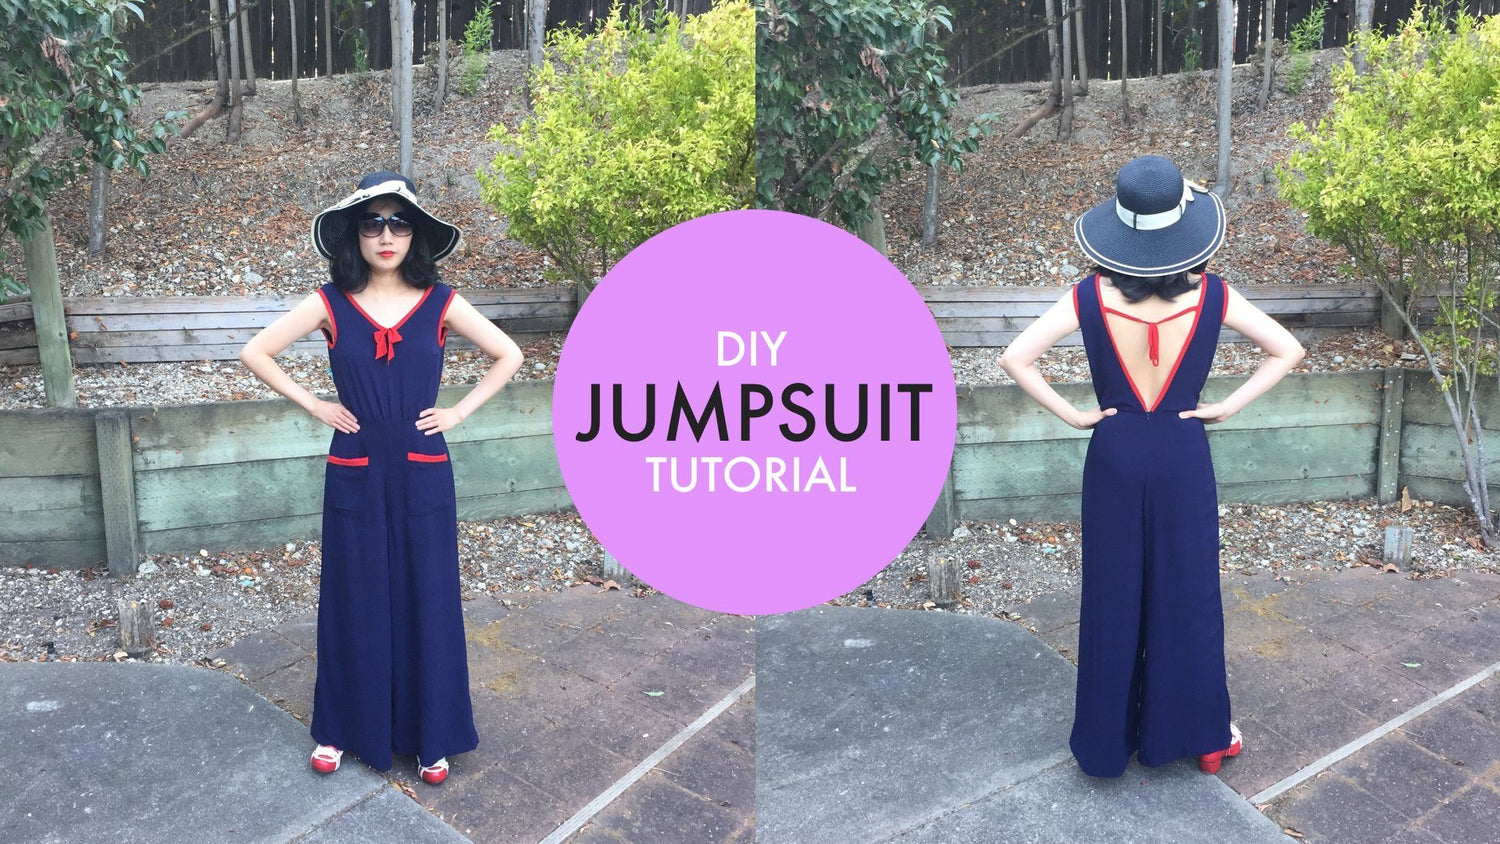
A DIY Rayon Jumpsuit Sewing Tutorial
This is a tutorial for a woman's summer jumpsuit with an open back. It consists of high waist, wide-legged pants sewn to a sleeveless top. You can adapt two different patterns together but I highly recommend an all-in-one pattern, such as the 1930s Beach Pajamas pattern made by Decades of Fashion, so you know all the pieces fit together.
This pattern uses 4 yards of fabric (double that if you are using a thin fabric like rayon challis and need 2 layers). For the fabric shown in the tutorial the darker side of the print is the "right side" and the lighter side is the "wrong side."
SUPPLIES:
- 8 yards of Rayon Challis (This tutorial uses a printed rayon so you can easily see the layering)
- Scissors
- Thread
- Pen/Chalk
LET'S GET STARTED!
1) Cut out all the pattern pieces: 2 leg front, 2 leg back, 1 bodice front, 2 bodice back (Optional: 2 pockets)
2) Sew darts into the bodice front and the waists of each leg.
3) Sew bodice back sides to bodice front, with right sides together. Sew the shoulder seams together. Leave the back open.
4) Sew one leg front to one leg back at each side, making a full pants leg. (Leave the crotch open for now). Repeat for each leg. (If you are adding patch pockets it is easier to sew the pocket to the leg front before assembling).
5) Flip one leg wrong side out (leg 1). The other leg should still be right side out (leg 2). Put leg 2 inside leg 1, matching up the crotch seams
6) Use a pin to mark halfway down the back crotch seam where the zipper will stop. (See the red arrow in the photo above).
7) Sew the rest of the crotch seam shut all the way to the front waist of the pants. You will now have an opening in the back for a zipper.
8) Sew the bottom of the bodice to the top of the pants. (Gather the front of the bodice to fit the waist of the pants). The red arrows in the photo below point to the waist seam.
9) Add a zipper to the back opening of the pants. Add one piece of elastic across, or one ribbon tie at each shoulder blade, to keep the back of the jumpsuit from falling open.
10) Finish the edges of the neck and armholes with bias tape binding, either homemade or purchased. You can add embellishments like a bow or belt if you wish.
HERE'S HOW IT LOOKS WHEN YOU ARE FINISHED!


This project/post was made by fashionista and dear friend Vivien Lee. Check her out at freshfrippery.com!
3 comments
Kyndler
It says in the paragraph above the supplies that it’s 4 yards, or 8 to double it if the fabric is thin.
It says in the paragraph above the supplies that it’s 4 yards, or 8 to double it if the fabric is thin.
Baddscorpio
8 yds? That MUST be a typo…
8 yds? That MUST be a typo…
Doris Cox Meshack
I love the jumpsuit pattern and directions.
I love the jumpsuit pattern and directions.