 White
White
 Pink
Pink
 Red
Red
 Orange
 Ivory
Ivory
 Yellow
 Gold
Gold
 Brown
Brown
 Green
Green
 Blue
Blue
 Purple
 Grey
Grey
 Black
Black
 Multi
Multi
 Abstract
 African Print
 Animal Print
 Baby & Nursery
 Buffalo Check
 Camo Print
 Celestial
 Church
 Damask
 Embroidered
 Floral
 Geometric
 Gingham Check
 Houndstooth
 Licensed
 Paisley
 Plaid
Plaid
 Polka Dot
 Sports
 Stripe
 Tie Dye

Taking a note from the 90's once again, one of the biggest trends in fashion this Fall is the overall, jumper style dress. The best part about this trend is that it is incredibly easy to recreate on your own! The only unique measurements to this dress are in the hips and the bust width, and the fit is essentially destined to be perfect every time since there are no arm holes.
For this pattern, you will cut out 5 pattern pieces and 2 lining pieces. The front and back of the dress are the same pattern piece, and then the pocket and straps add on to finish it off. The only fitting necessary is in the hips, and if you want to simplify it even more, you can forget the lining altogether. The lining does help to add substance to the dress, as the fabric isn't as thick as something like a corduroy that you might usually see these dresses made out of, so I still recommend that you add one, but to each their own!
Though these dresses are in right now, they will also be great for the Spring and Summer. By changing boots out for sandals and a long sleeve tee out to a tee shirt, you have an entirely different outfit! Take a look at the instructions below to create your own overall dress.
Supplies:
- 1 yard of Gold Twill Fabric
- 1 yard of Gold Poly China Silk Lining
- 2 Buttons
- Yellow Thread
- Sewing Machine
- Pins
- Scissors
- Measuring Tape
Time:
4 hours
Difficulty:
Medium
LET'S GET STARTED!
- Fold the fabric over two times, and cut out the pattern pieces as shown in the illustration. You will need 2 BODY pieces, 2 STRAP pieces, and 1 POCKET piece. The bottom section of the BODY piece width will be half the length of your hips measurement plus 2", and the width of the top section will be half the length of your hips measurement minus 2".
Also make sure to cut out 2 BODY pieces from the lining fabric.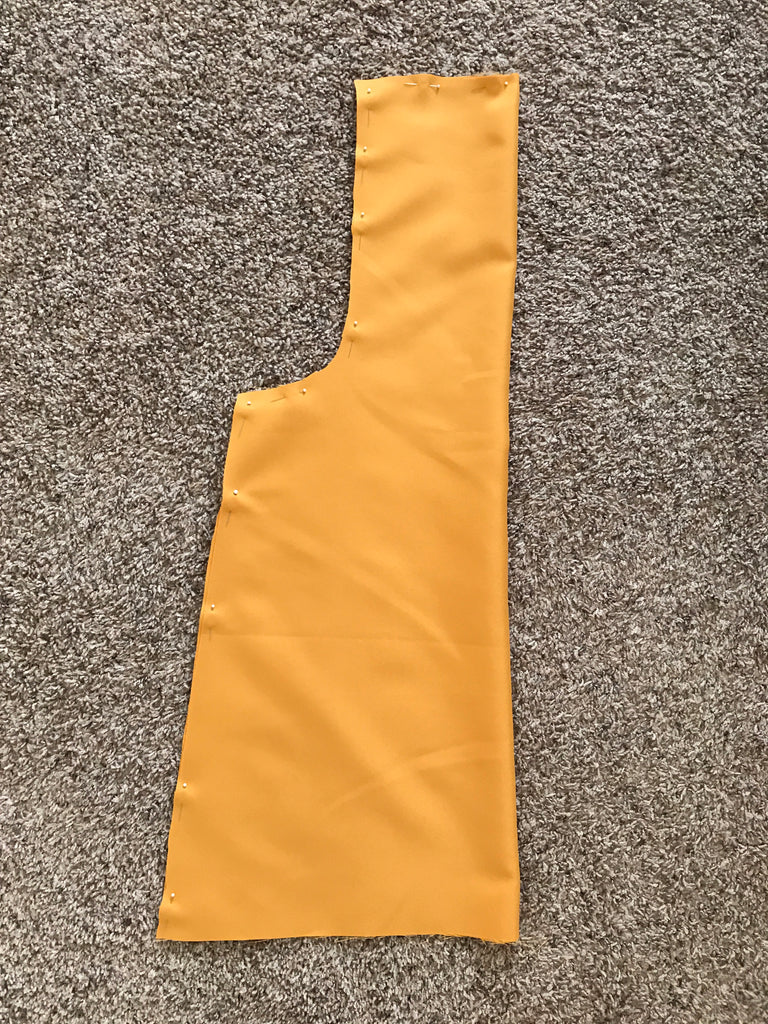

- Start by placing the BODY pieces on top of one another and pinning the sides of the skirt together. Sew along these edges to connect them. Repeat with the lining BODY pieces. Turn dress made from the fabric right side out and leave the lining inside out.

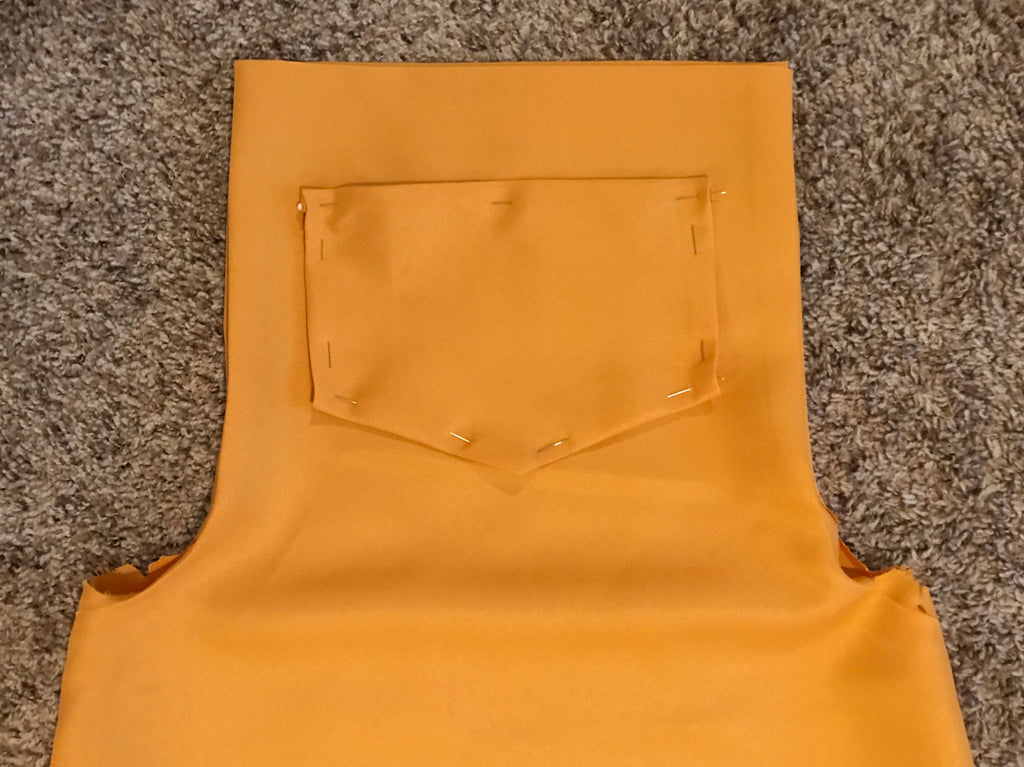
- Take your POCKET piece and fold and iron the edges over 1/2" on all sides, and then fold and iron over the top edge again. Sew along the edges of the pocket 3/8" from the edge to secure the folds. Pin the pocket on to the dress about 3.5" from the top and centered on the dress. Sew along the sides and bottom edges right at the edge of the pocket.
- Place the dress inside of the lining and pin the top edges and arm holes together. Sew the two pieces together all the way around. Pull the dress out of the lining and right side out so that the lining is inside of the dress.

- Iron down the edges and corners at the top of the dress. Again, sew along the top edges to secure them so that the lining does not slide out of the dress when you are wearing it.


- Create the straps by taking your STRAP pieces and folding the long edges over 1/4" twice. Iron and pin them down. Sew along these folds at the edges to match the double seam on the pocket.
Fold the short ends over to the back as well and sew them down. Sew the buttons on to one end of the straps.


- Take the other end of the strap and sew this to the back of the dress. Finish off the dress by adding horizontal button holes to the front about 1" in from the corner at the top and the sides.
Place the buttons into the holes, and you are done!


This Tutorial was created by Julia Bleck of Bunny Baubles Blog
4 comments
Nadeen
I don’t see the Overall Dress and the website you refer to says it can be found in your website! Hope do I get the printable pattern?
I don’t see the Overall Dress and the website you refer to says it can be found in your website! Hope do I get the printable pattern?
Nadeen
I don’t see the Overall Dress and the website you refer to says it can be found in your website! Hope do I get the printable pattern?
I don’t see the Overall Dress and the website you refer to says it can be found in your website! Hope do I get the printable pattern?
Mary Potter
I don’t see a pattern for this overall dress?
I don’t see a pattern for this overall dress?
Paula elliott
love it its simple but just right for causal wear to go antiqueshopping!
love it its simple but just right for causal wear to go antiqueshopping!