 White
White
 Pink
Pink
 Red
Red
 Orange
 Tan
Tan
 Beige
Beige
 Ivory
Ivory
 Yellow
 Gold
Gold
 Brown
Brown
 Green
Green
 Blue
Blue
 Purple
 Grey
Grey
 Black
Black
 Multi
Multi
 Abstract
 African Print
 Animal Print
 Baby & Nursery
 Buffalo Check
 Camo Print
 Celestial
 Church
 Damask
 Embroidered
 Floral
 Geometric
 Gingham Check
 Houndstooth
 Licensed
 Paisley
 Plaid
Plaid
 Polka Dot
 Sports
 Stripe
 Tie Dye

Home decor feeling a bit drab lately? Need an afternoon quick-sew? We’ve got just the thing!
Forget about buying those boring curtains from the store that don’t even fit your windows. Make your own! In a short afternoon you can have designer curtains hung and ready to enjoy. Grab your favorite Jacquard Damask print and soft flowy voile for the perfect pairing to make these grommet curtains with sheer voile valance!
Supplies:
- 3-6 yards Jacquard Damask
- 10 yards Sheer Voile Fabric
- Thread to Match
- Fabric Scissors
- Measuring Tape
- Pins
- Sewing Machine
- 6-10 Curtain Grommets
- Optional: Grommet Tape
- Optional: ¼ yard muslin
Time:
3-4 hours
Difficulty:
Easy
LET'S GET STARTED!
-
Measure your window.
You’ll want to measure from curtain rod to floor, or desired length. I’ll be making full length curtains to cover a double window for dramatic effect. Personally, I think grommet curtains are much better suited as full length. My curtains will be 98” long. Add 8” to this number for the top (3”) and bottom (5”) hems.
Next measure width of your curtains. Multiply this number between 1.5 to 3.5 times, depending how full you want your curtains.
TIP: Remember you won’t have the curtains pulled back all the time, and you will want fullness when they are loose.
-
Cut two panels of main fabric, 2-4 panels of voile. I cut 4 panels of voile for a little more coverage in the middle, but you can easily reduce to 2!
Main Damask Panels
- On outer edges (longest side), measure and press 1”.
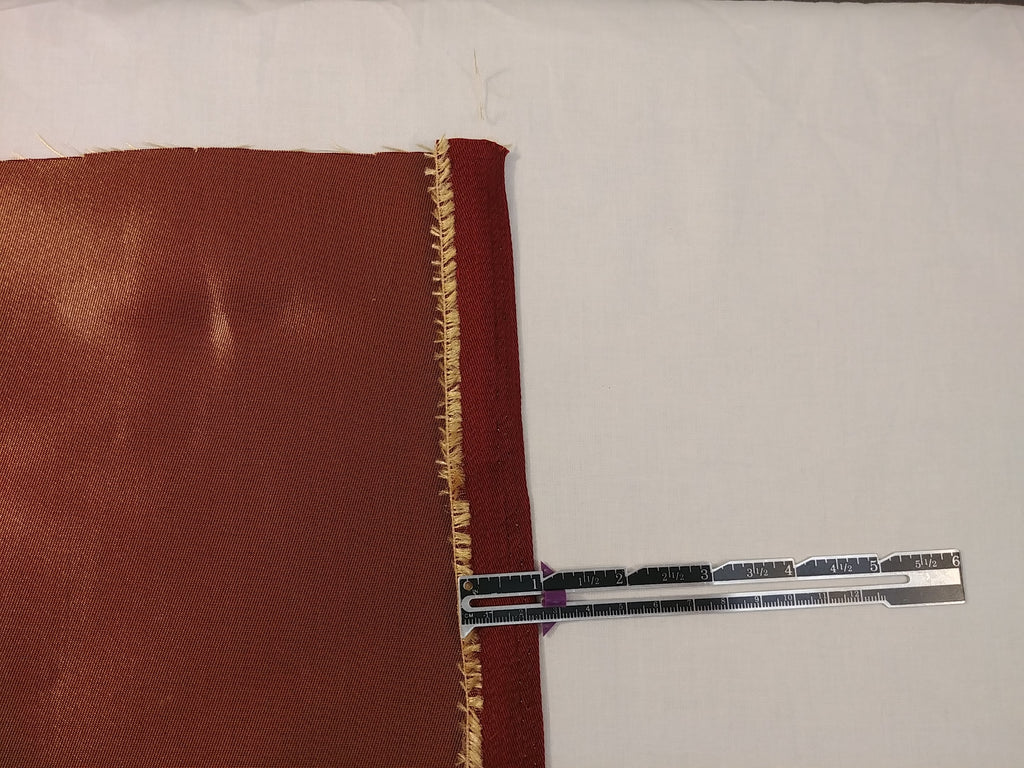
- Fold and press 1.5”. Sew ⅛” from edge.


Tip: Because the damask is a thicker fabric, you may need to help guide the fabric. I find this easiest by pushing and pulling from both sides of your presser foot. If you do not want to do this, using a walking foot may help. You can grab the fabric in the back, just don’t pull too hard!

- Create top casing
Concerned your top hem isn’t perfectly level after cutting? Fold and press top hem 3” from top of fabric.

Open fabric back up, then measure 3 inches from your PRESSED LINE to the top. Fold and press that portion of the fabric only (about ½” to 1” of fabric). Be careful not to press out your original line, you will need that! Using the technique, you’ll eliminate any ebb and flow from cutting or fraying.
- Sew ⅛” from edge of fabric.


Here is your casing after all is pressed!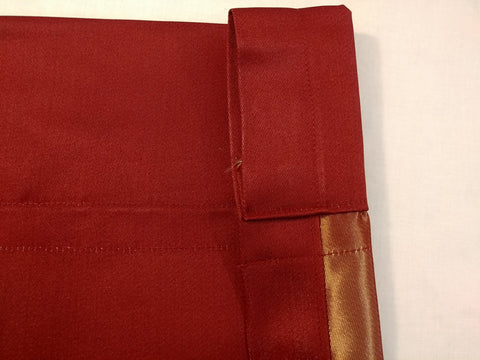
TIP: To add detail, I like to stitch 1” below my last stitch line for a ‘topstitched’ look.


Grommets
- If you use grommet tape, follow instructions from the packaging on how to insert! I used standard 1.56” inside diameter grommets. Check your rod size before placing your grommets! I wanted a deep pocket between my grommets, so I placed them 6” apart.
- To find how many grommets you will use, measure your finished curtain width, subtract 5” (for sides), then divide by an EVEN number of desired grommets. Mark a dot every inch number you came up with.
Your number of grommets must be even so it flows on the rod best. You are subtracting the 5” so there is a 2.5” starting point on each side. I started my grommets a little bit too far into the curtain, and as a result, some of the curtain juts out in a way I didn’t necessarily want, but worked.


- After all grommets have been marked (the handy guide will usually come with your grommets), install grommets according to package. Usually, this entails cutting out your circle, then snapping the front and back grommet together.

Don’t forget your hem! Leave the hem for the end so you can re-check your height. - Repeat step 3 & 4 from the main damask panel section, but this time you will be folding up 5”. I add a thicker bottom hem for more structure, but you don’t necessarily need to do this. You’ll end up with a 4” hem on the bottom.


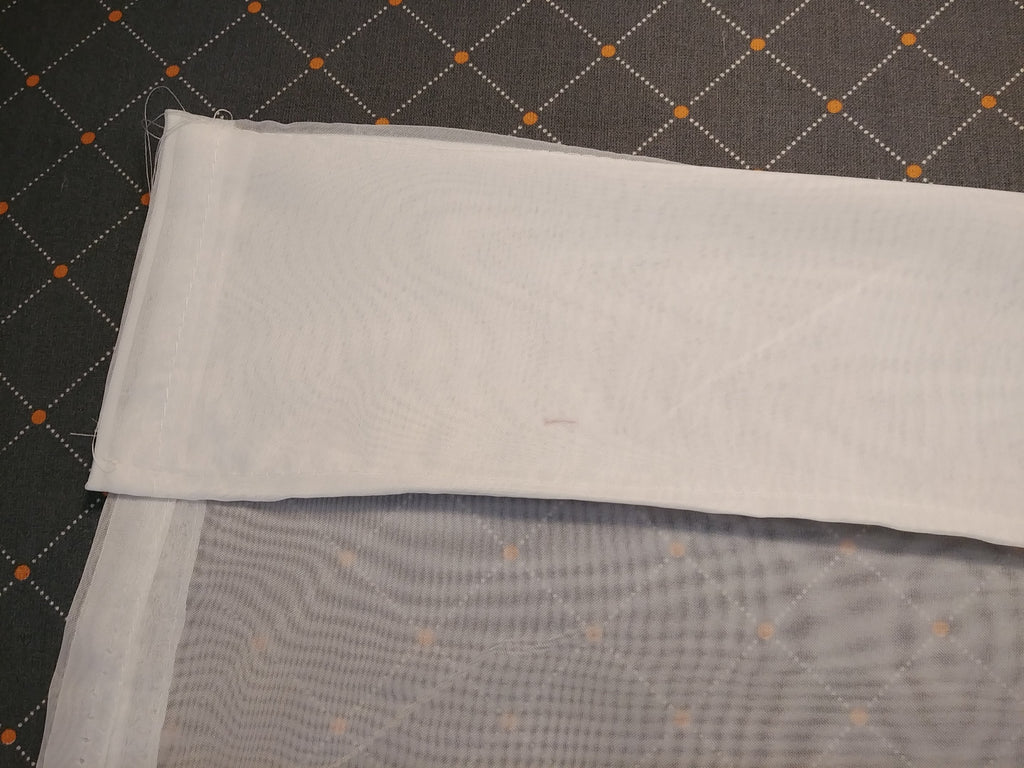
Sheer Voile
As much as I *love* the damask, I love a sheer voile just a little bit more. This voile has a soft, dreamy, and romantic drape. You will essentially be creating these curtains the same as your main panels, with minor differences
- Press your side curtains 1”, then again 1”. Repeat this for both or all four panels on the long side.

- Sew ⅛” from the edge on all panels.

- If you are sewing doubled panels, line up your tops and baste stitch ½” from raw edge.

- Trim across for a smooth edge.

-
Cut a piece of muslin, or use grommet tape, 4” wide by the length of the curtain width.
- Sew muslin to basted line, and bottom of muslin.

- Fold and press your fabric over. Sew ⅛” from edge.


Draped Voile Valance
The last wow piece of these curtains is our valance. This step only requires draping a rectangle of fabric.
- Measure across your window, mimicking the lowest rounded portion you want. Measure from curtain rod to bottom of valance you are looking for, double this number. Add all your measurements together.
- Hem your valance. You can choose to leave this unhemmed, it’s up to you! If you do hem, you’ll need to press 1”, then another 1”, and sew ⅛” from the edge.
- Cut a rectangle 6” x 3”. Press to 6” x 1”. This will be your holder at the top of your curtains. If you want two place holders, you will need to do this twice.
- Drape! Fold your voile over curtain rod at one end, drape across to the other end. You may need someone to help you here, depending how long your curtains are. Fluff your valance down to the desired length.
- Place your holder in the center of your curtain, and hand sew in place.
Voila! You have new designer-worthy grommet curtains and valance! You can change up this look easily by switching your main fabric out, or turn the curtains around! You’ve finished everything off nicely, why not take advantage of the other side of your damask?


1 comment
MSCHU-Z GRIGSBY
What if you never put Grommets in before? why it was not shown? The template for the circle Where and how do I find it?
What if you never put Grommets in before? why it was not shown? The template for the circle Where and how do I find it?