 White
White
 Pink
Pink
 Red
Red
 Orange
 Ivory
Ivory
 Yellow
 Gold
Gold
 Brown
Brown
 Green
Green
 Blue
Blue
 Purple
 Grey
Grey
 Black
Black
 Multi
Multi
 Abstract
 African Print
 Animal Print
 Baby & Nursery
 Buffalo Check
 Camo Print
 Celestial
 Church
 Damask
 Embroidered
 Floral
 Geometric
 Gingham Check
 Houndstooth
 Licensed
 Paisley
 Plaid
Plaid
 Polka Dot
 Sports
 Stripe
 Tie Dye

Shorts can be a tricky item to shop for. It is rare that a standard size covers the vast array of body types where your waist and hips are totally comfortable, and your booty is flatteringly (and completely) covered. In order to fix this issue, the only viable solution is to make your own!
By taking your own measurements at your waist and hips, putting together this shorts pattern takes absolutely no time. One yard of fabric and a piece of 1/2" elastic is all you need to whip them up, though it is recommended that you test out the pattern using a piece of muslin to make sure the fit is completely correct before cutting into your fabric.
The paper bag waist style has been everywhere this summer, and it's no wonder why. Since the waist of the shorts is entirely elastic, it almost feels like wearing a pair of pajama shorts. With pockets added, of course. The ruffled waistline is feminine and playful, making them easy to dress up or down. The pair styled in this post were made using a gorgeous, high quality, navy linen from Fabric Wholesale Direct, but any cotton fabric would also be appropriate.
Supplies:
- 1 Yard Linen Fabric
- Matching Thread
- 1/2" Elastic the length of your waist measurement
- Measuring Tape
- Sewing Machine
- Pins
- Large Safety Pin
Time:
3-4 hours
Difficulty:
Medium
LET'S GET STARTED!


- Start off by measuring your waist and hips in order to calculate the measurements for the FRONT, BACK, and WAISTBAND pieces per the instructions above. Cut out two FRONTs, two BACKs, and one of each of the WAIST pieces (front and back), as well as two POCKET pieces. Never forget to wash and dry your fabric before starting any project!
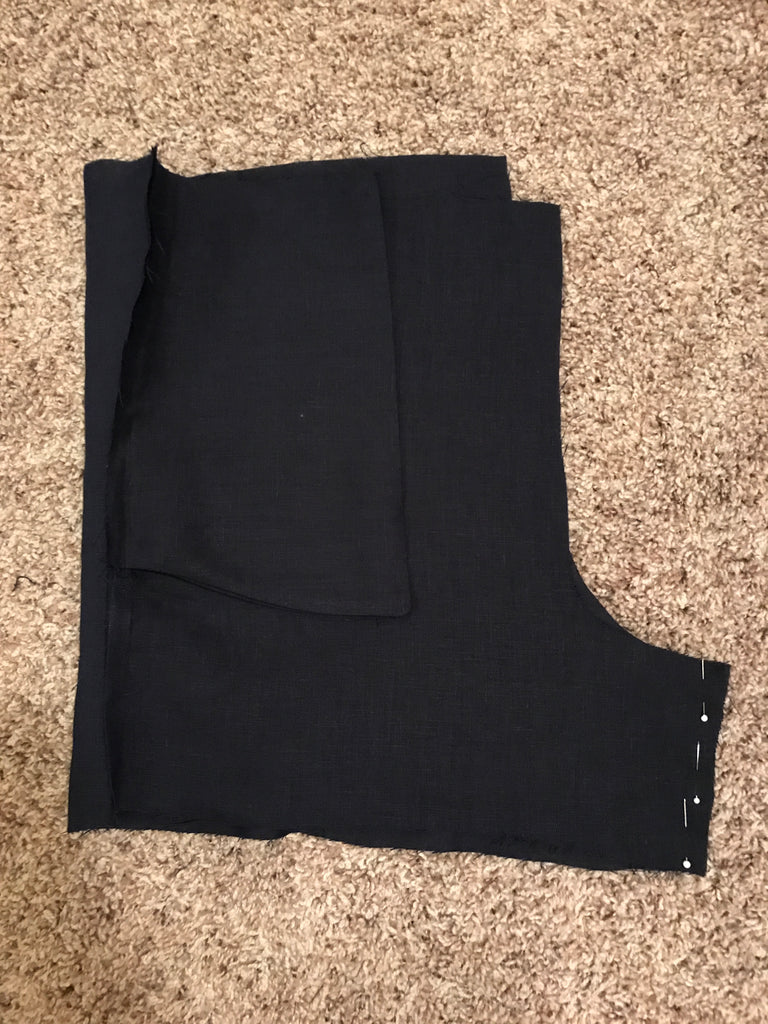
- The first assembly step is to pin the POCKET to the FRONT with the angled edge of the pocket lining up with the side of the shorts. Sew along this edge 1/2" from the edge of the fabric.

- Take the POCKET and fold it in half. Then pin the bottom edges together and sew 1/2" from the edge of the fabric.

- Take the POCKET and turn it right side out so that the seam at the bottom of the pocket is hidden. Fold it to the back of the shorts so that a small triangle shows on the side of the shorts.


- Place the BACK on top of the FRONT lining up the sides of the shorts where the pocket is and pin the edges together. Also line the inseams up and pin together. Sew the sides 1/2" from the edges of the fabric. Complete steps 2-5 for each side of the shorts.
- To connect the legs together, turn one side of the shorts right side out and place it inside the side that is inside out. Line up the inseam of the shorts and pin the two pieces together. Sew the pieces together 1/2" from the edge of the fabric. Pull the one leg out of the other so that the shorts are right side out.


- The next step is to add the waistband. Take each WAIST piece and sew the two short sides together. Make sure that the ring of fabric is the same length as the waist of the shorts at the top.
Then, fold the waistband over lengthwise to create a ring pocket for the elastic. Slide this over the top of the shorts so that the opening to the pocket lines up with the top edge of the shorts. Sew along this edge 1/2" from the edge of the fabric all the way around, leaving 1" open to insert the elastic. Sew another seam 3/4" above this seam in the waistband to create a pocket for the elastic.


- Insert the elastic into the pocket by attaching a large safety pin to the end of the elastic and push it through the pocket. Once you have made it all the way through, sew the ends of the elastic together with a zig-zag stitch. Close up the opening in the seam you made in step 6.

- The final step is to hem the bottom of the shorts. Sew a zig-zag stitch along the bottom edge of the shorts. This will keep the hem from fraying and can also be done with a serger. Then fold the bottom edge up about 3/4" and sew along it to secure the hem.
In order to prevent fraying on the other seams of the shorts, turn them inside out and sew zig-zag stitches along all exposed seams.


YOU ARE ALL DONE!


This Tutorial was created by Julia Bleck of Bunny Baubles Blog


6 comments
Richelle
Not sure if I need glasses but I really can’t find the link for the actual pattern cut outs.
Not sure if I need glasses but I really can’t find the link for the actual pattern cut outs.
julie taron
Thank you for sharing your pattern. You wouldn’t believe how long I have been looking for a .pdf paperbag shorts pattern. Trying to recreate my daughter’s favorite shorts which are so worn out. All I need to do is add a zipper fly and we’ll have it down.
Thank you for sharing your pattern. You wouldn’t believe how long I have been looking for a .pdf paperbag shorts pattern. Trying to recreate my daughter’s favorite shorts which are so worn out. All I need to do is add a zipper fly and we’ll have it down.
Zoe
Just wondering if seam allowance is included in the measurements for the pattern? Thanks :)
Just wondering if seam allowance is included in the measurements for the pattern? Thanks :)
Terry
Looking for the pattern but it only has directions. What am I missing?
Thank you
Terry
Looking for the pattern but it only has directions. What am I missing?
Thank you
Terry
Reese
“paper bag waistband”???? I’ve never seen a paper bag that closes like that. What? You don’t like the far more accurate term “DRAWSTRING”?
“paper bag waistband”???? I’ve never seen a paper bag that closes like that. What? You don’t like the far more accurate term “DRAWSTRING”?
Idowu Ijoma
Simple and nice, good job! 👍🏼
Simple and nice, good job! 👍🏼