 White
White
 Pink
Pink
 Red
Red
 Orange
 Ivory
Ivory
 Yellow
 Gold
Gold
 Brown
Brown
 Green
Green
 Blue
Blue
 Purple
 Grey
Grey
 Black
Black
 Multi
Multi
 Abstract
 African Print
 Animal Print
 Baby & Nursery
 Buffalo Check
 Camo Print
 Celestial
 Church
 Damask
 Embroidered
 Floral
 Geometric
 Gingham Check
 Houndstooth
 Licensed
 Paisley
 Plaid
Plaid
 Polka Dot
 Sports
 Stripe
 Tie Dye

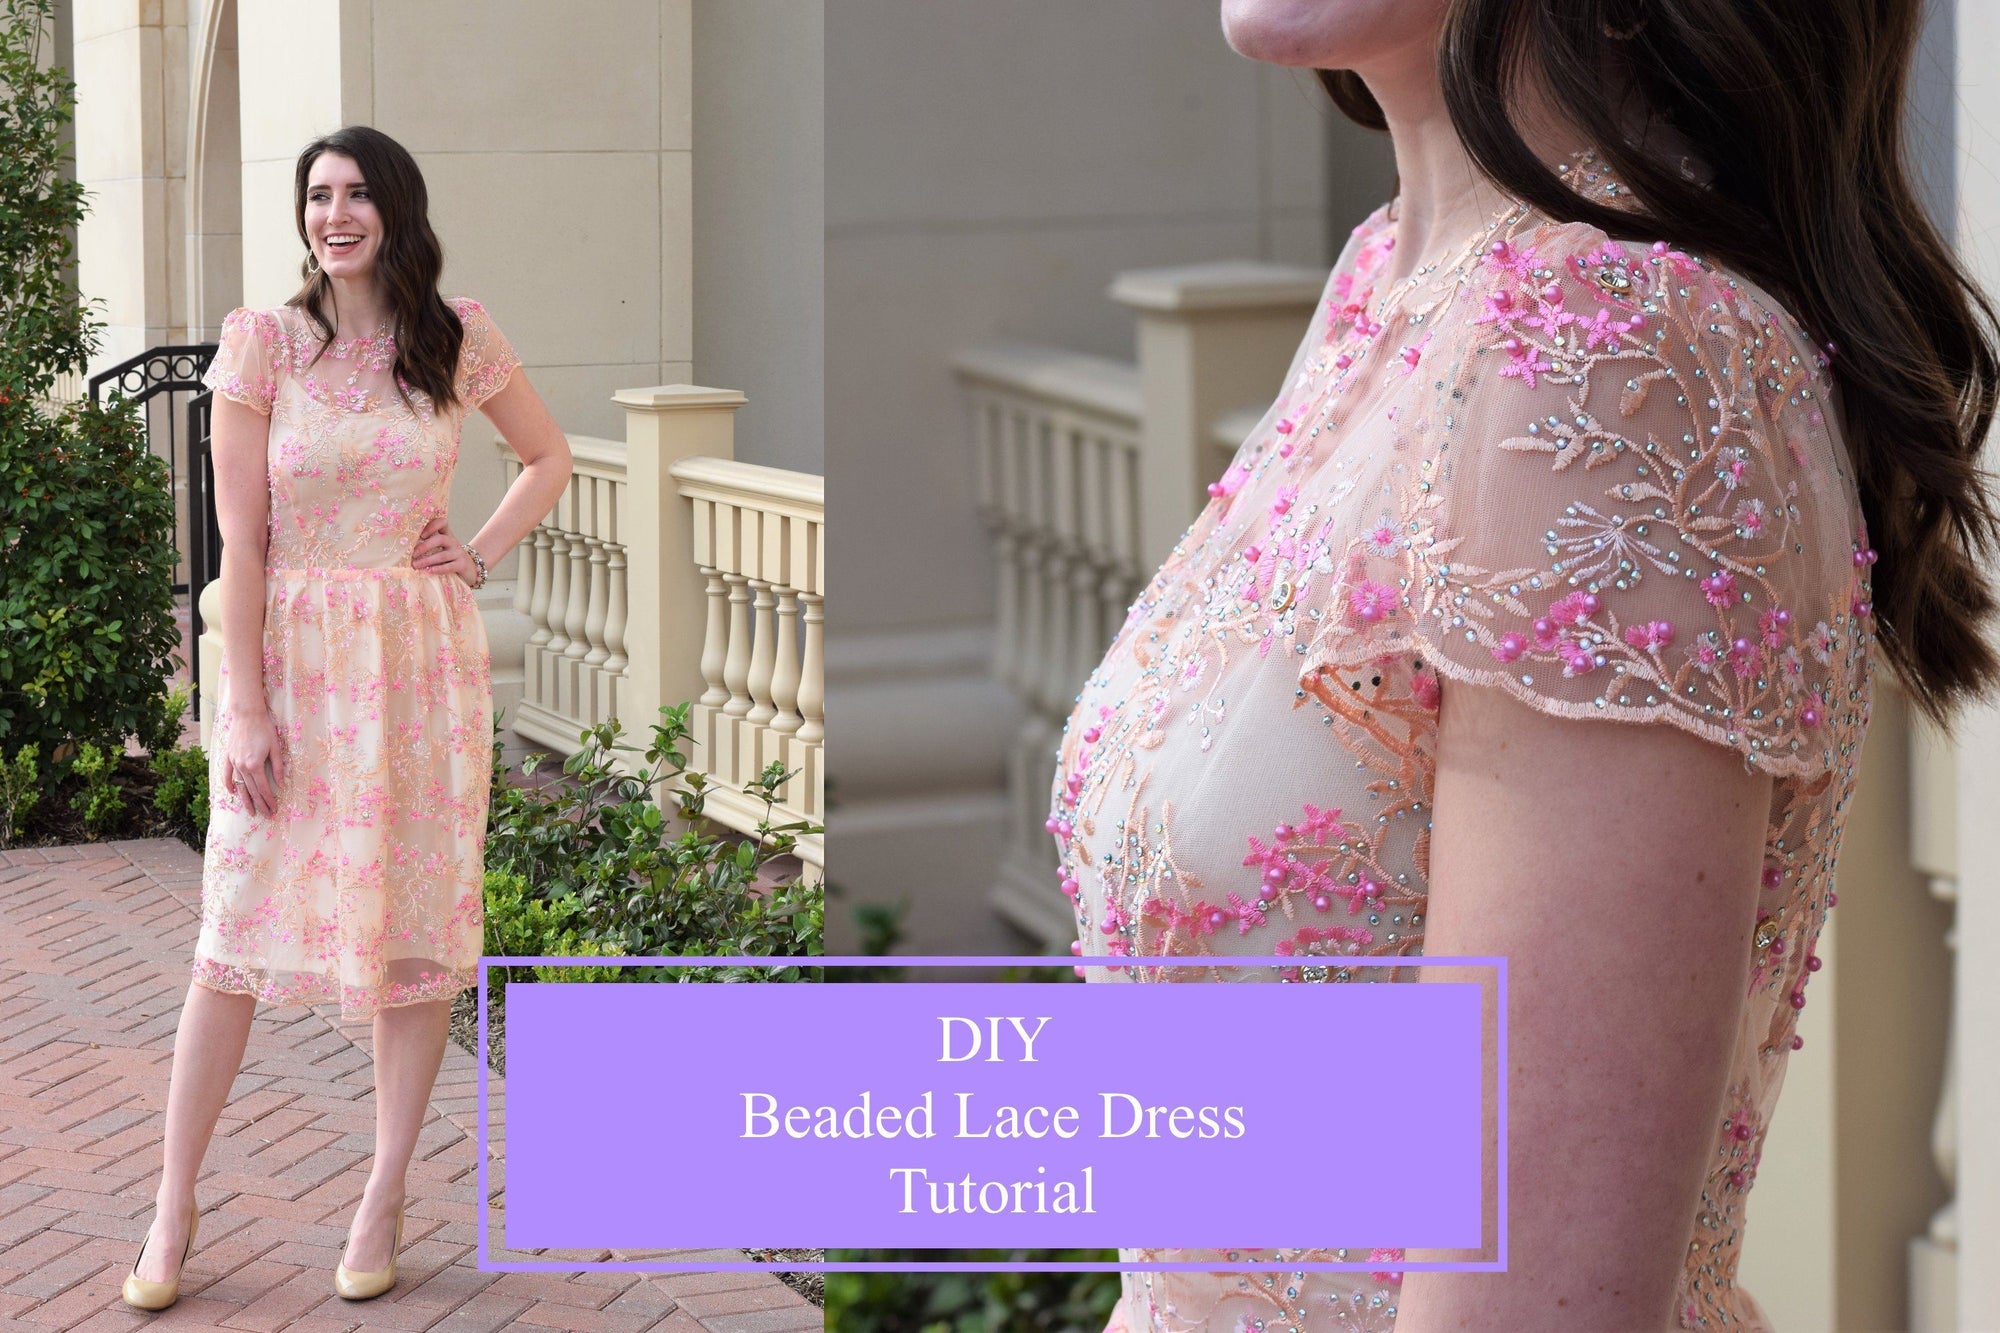
A DIY 1920s Flapper Dress Sewing Tutorial
Are you planning to have a picnic, Gatsby-style, and need a sweet vintage dress? Have you been invited to a Roaring 20s shindig and need some flapper clothes? This tutorial will make a simple 1920s dress with a perfectly period-appropriate silhouette. This kind of dress can be dressed up for evening using fancier fabrics like lace, silk, and velvet, or dressed down for a day time event using printed cotton or rayon. You can decorate it with flowers, ribbons, or other accents if you wish! Underneath, a sweet silk slip completes the look. Once you have this, you'll be ready to dance the Charleston or party like Daisy in the Great Gatsby!
SUPPLIES:
- 3 yards French guipure lace
- 2 yards pink Silk Charmeuse
- Thread to match your fabrics
- Measuring tape
- Scissors
- Pins
- Tailor's chalk or disappearing ink pen
- Sewing machine
- Loose tank top to use as template
- Optional: lace trim for the slip, flowers and shiny buckle for the dress
TIME: ~8 Hours
DIFFICULTY: Medium
PART 1: Slip Dress
1) Before we begin take the following measurements:
B = your chest circumference, across the top of your bust, plus 4 inches
H = your hip circumference, plus 4 inches
L1 = the length from the top of your bust to your hip, plus 1 inch
L2 = the length from your hip to above your knee, plus 1 inch
(These measurements include ease and 1/2 inch seam allowance).
2) You are going to make a long, slightly trapezoidal shape using these measurements. The top is B divided by 2, and the total length is going to be L1 + L2. Cut this all as one piece. (The middle line is not a seam; it's just to make sure it's wide enough for your hips). You can draw this on paper first, or directly onto the fabric using rulers.

3) Cut two of these trapezoids, place them right sides together, and sew the long edges together.

4) You should now have a long tube. Hem the bottom and top of the tube, and if you like, add lace to decorate.
5) Cut two long rectangular straps for the shoulder that are 3 inches x 15 inches. (These are extra long; you will cut off the excess in a later step). Fold each strap lengthwise (inside out) and pin and sew down the long edge, making a skinny tube.

6) Turn the long tubes right side out and iron flat. Add lace to the straps now if you wish.

7) Sew or pin one end of each strap to the BACK of the slip, where your shoulder blades would be.

8) Put the slip on and then pin the other end of the straps to the FRONT of your slip, over the top of your bust, and adjusted to the right length. Cut off the extra length. Sew the straps to the inside of the slip.

Now you are done with the slip!

PART 2: Lace Top
1) For the top half of the dress, find a sleeveless tank top style to use as a pattern base. (This should be made of a non-stretchy fabric, and a little loose-fitting, otherwise your dress will be too tight). The ideal length for the tank top is to reach your hips; if it's too long you can fold the bottom up before tracing.
2) Lay the tank top on your fabric and cut around it, leaving extra space for a seam allowance and extra fit room. Depending on how loose your tank top is, that extra space may be 1-2 inches. Don't forget the shoulders!

3) Use that piece you cut out to trace a second piece, just slightly wider on the sides, to be the front piece of your dress. Sew the side seams and shoulders together.

4) Cut a rectangle panel for the skirt that is 2.5 times the circumference of your hips. The width will be the length of your hips to below your knee. (If you want a historically-accurate dress the hem should be below your knee, and if you want a more modern look cut the skirt shorter).

5) Sew the short edges of the skirt panel (right side) together, making a big skirt shape. Turn the skirt right side out. The top edge of the skirt will be gathered and sewn to the top part of the dress, and they meet at the hip.

6) If you have a fancy edge on your dress top, have your top/skirt seam overlap with the top showing.

7) Finish the neck and armholes by folding or rolling the raw edges of the fabric inside the dress and stitching them down.

8) Optional: You can cut a sash for the middle that consists of a long rectangle with pointed ends. (You can use the leftover fabric from making your slip). The length and width will depend on personal preference, but the length should be at least double your hips plus extra. (Here the one shown in the photo is 55 inches long and 7 inches wide, with the edges tucked in). Wrap the sash around the hip area of your dress, tucking in the raw edges and sewing them down. For texture and visual interest, you can "wrinkle" the fabric while pinning and sewing it down.

9) Optional: Embellish your sash with a shiny buckle and some little ribbon flowers. You can also put more silk charmeuse, ribbons, or flowers on the front of the dress to decorate it!

Your dress is now done and ready to dance the Charleston!
This project/post was made by fashionista and dear friend Vivien Lee. Check her out at freshfrippery.com!
1 comment
Katrina
This is a super sweet dress, but it will not fit those of us with larger cup sizes. My upper bust+4” is not enough to go around my full bust. So how much would I add to give enough ease for my 7” difference (F cup)?
This is a super sweet dress, but it will not fit those of us with larger cup sizes. My upper bust+4” is not enough to go around my full bust. So how much would I add to give enough ease for my 7” difference (F cup)?