 White
White
 Pink
Pink
 Red
Red
 Orange
 Ivory
Ivory
 Yellow
 Gold
Gold
 Brown
Brown
 Green
Green
 Blue
Blue
 Purple
 Grey
Grey
 Black
Black
 Multi
Multi
 Abstract
 African Print
 Animal Print
 Baby & Nursery
 Buffalo Check
 Camo Print
 Celestial
 Church
 Damask
 Embroidered
 Floral
 Geometric
 Gingham Check
 Houndstooth
 Licensed
 Paisley
 Plaid
Plaid
 Polka Dot
 Sports
 Stripe
 Tie Dye

Valentine’s Day is right around the corner! Who needs a formal gown? Anyone have an opera, concert, or ballet to attend? Just a gown lover in general? Let. Me. Show. You.
This will be your next new favorite dress. Not only do you get a deep v (without the fear of “falling out”), but you have a deep slit, a train, AND fabric with movement. As if the dress could be any better, you can dress it up for something formal, or dress it down (and add a sash) for something a little more medieval.
I felt SUPER regal, and SUPER sexy in this dress, but not too exposed! The Power mesh paired with Stretch Velvet was the perfect match in feeling secure, (fairly) warm, and fashionable. Everyone knows velvet is in right now. Grab some stretch velvet in your favorite color for your next night out, and let’s get started!
Supplies:
- 3-4 yards Stretch Velvet
- .5 yard Power Mesh
- Thread to Match
- Measuring Tape
- Fabric Scissors
- Pins
- Sewing Machine
- 3/8” Elastic
Optional:
- Serger
- Maxi Lock Thread
- Coverstitch
- 5Ribbon
- Love Notions Tessa Sheath Dress
Time: 6-8 hours
Difficulty: Intermediate
I used the Tessa Sheath Dress by Love Notions to begin my project, but you can easily use an existing stretch top or dress that has sleeves to achieve the same result. You can choose to modify the skirt portion of the pattern as well, but I will also go over how to do this without the pattern.
LET'S GET STARTED!
Part 1: Top Construction
-
Based on Bust and Upper Bust, determine size needed from pattern. You only need to cut out to the waistline for the top portion. Trace front, back, and sleeve length you’d like.
If you are not using the pattern, you can fold your top or dress in half on a piece of paper, then trace along it, then add seam allowance. Trace off a front, back, and sleeve.

-
Draw or tape out your desired look on both front and back.
I wanted a deep plunging V-neck with the bateau neckline offered in the pattern for my mesh portion.
I first tape out what I want in the front and back, then trace over my pattern.
If you don’t have a mannequin available, you can trace out your desired shape on top of your pattern. If drawing on a flat pattern, remember the bust area will stretch your shape outward, just slightly. If you draw your lines with any convex shape, it may be more than you originally thought due to stretching. Be sure to test this out on some scrap material if you’re concerned.


-
Cut along your new pattern for your mesh (where you drew your neckline). You can either remember to add seam allowance while cutting (and possibly have to cut twice because you forgot.... not saying that’s from experience), or add more paper to add seam allowance. Label your new pattern pieces accordingly.

-
Cut out your front/back, and sleeve pieces, both mesh and velvet. Mesh will only have one piece in front, one piece in back. Velvet will have two pieces for front, and two for back. The sleeves are all mesh. I measured my arm, then added 1” for hemming, but you can go based off the pattern or off a dress you already own.


-
Sew your sleeves together.

-
Sew your two velvet pieces to middle mesh piece for both front and back. Make sure you follow the curve if there is one. It will lay flat later on.
I wasn’t initially happy with how my attachments came along. In order to achieve perfectly symmetrical lines, you need to have perfectly symmetrical tension as you sew. I suggest sewing in the same direction both times to help eliminate any off tension.


-
Sew your front and back sides and shoulders together.

-
Set your sleeves in.
I initially thought I might like velvet sleeves more, but it didn’t go with my vision. The blue sleeves to me made the dress seem more ‘princess’ than I was going for. Depends what look you want! That’s the beauty of this fabric – it can be so many things.

-
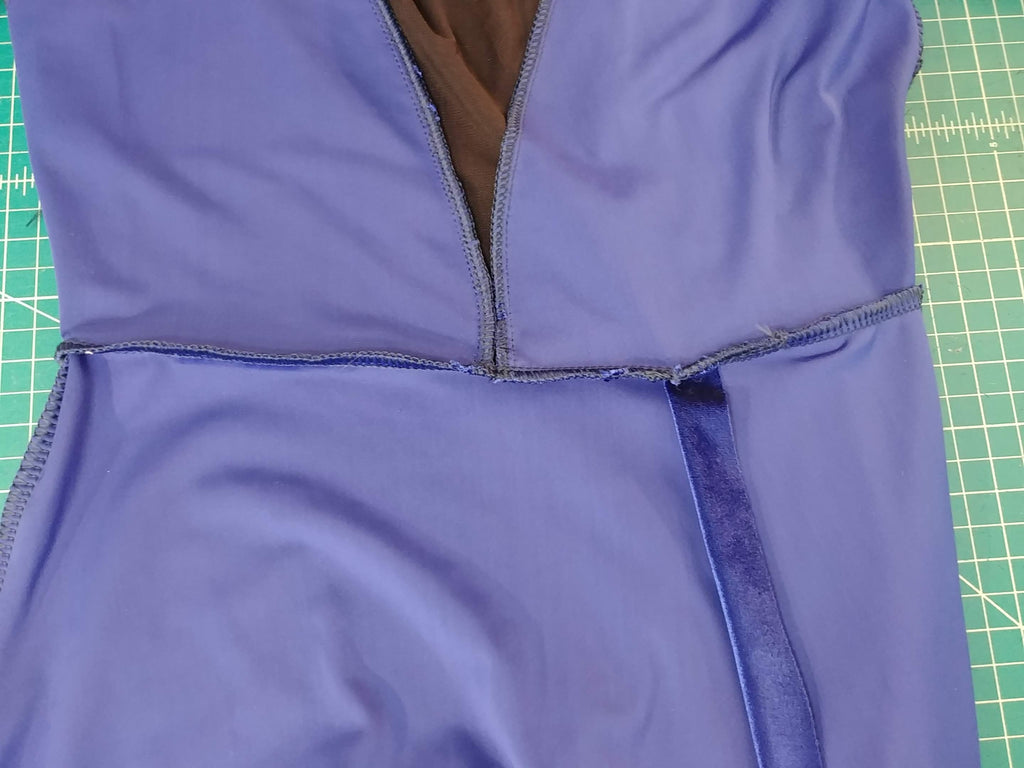
This is an optional step. The velvet can become a bit heavy with a full-length skirt, so I like to add a little stability to the seams. I used 5/8” ribbon on the side seams to avoid a great deal of stretching. I highly suggest it, but it’s not imperative. Your waist line will likely be a bit lower than you originally intended.
- Finish off your neckline and sleeve hem.
I used 3/8” black elastic for this part. You should opt for a similar color to your mesh here, as it will show through the other side. To measure my elastic, I first laid out my top. I am only adding elastic about ½" from the shoulder on each side (so you’ll need two pieces). Using two pieces reduces bulk and also helps avoid gaping. Two pieces, especially tapered like I have, are a bit harder to install. I sewed a straight stitch at each shoulder to attach neckline and elastic. Your mesh will want to gap at the neckline more than other fabrics, so make sure your elastic will be tight enough.
After you’ve sewn your elastic to neckline, you’ll need to fold it under and topstitch.


Part 2: Skirt Construction
This step is going to be much more your own preference vs what I tell you to do.
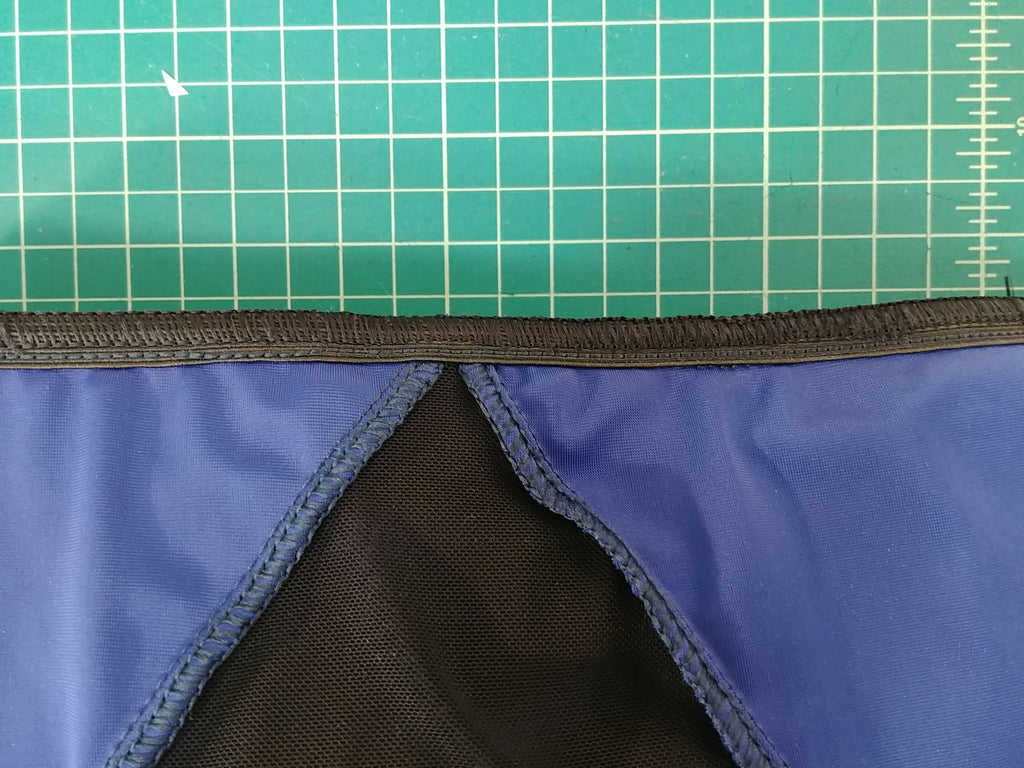
To get my skirt, I used three panels. Left, Right, and Back panel. The right panel is about half as wide as the left, because it has a full slit. I used an existing skirt to base my measurements, but you can also use the Love Notions pattern.
For the back panel, I had 14” of excess train. You can take your skirt or Love Notions pattern, mark 14” below the middle of the skirt hem, then round out up to the sides.
For the right panel, I made my panel 6” at the top, and flared out so that the bottom hem is about 15” wide.
For the left panel, I made my panel 14” at the top, and flared out so that the bottom hem is about 35” wide.
- Sew side seams of skirt together.
-
Fold your panel hems over 1”. Coverstitch (or zigzag/twin needle on regular machine) in place. You may need to use Stitch Witchery here (see instructions on package). You want to do this step now so that it’s a clean finish for sewing your waist together. If you like the look of the unfinished edge, or no stitching, you can opt to not use any Stitch Witchery, or not hem at all. I used the Stitch Witchery, but need to coverstitch over as it doesn’t stay put so well on the velvet.

Stitch Witchery Guide:


Use this same guide to hem your skirt bottom (you can do this step now or after you’re all done).
-
Sew waist together, right sides together, matching up side seams.
Tip: Keep right panel above left panel. While sewing together, your order should be: dress top waist, right panel, left panel. Because the waistband stretches, don’t worry if you’re a little off! You should try to be close, but also may want to stretch your left panel over just a bit. The larger the overlap, the more covered your slit will be.
Whichever panel you want on the outside, should be directly next to the waist while sewing.
-
Optional step: For more security and recovery (because the skirt is fairly heavy), I added elastic to the waistband. I measured my waist, and subtracted 2”. I used my serger to attach this directly to the waistband, but you can use a zigzag stitch on your regular machine.

-
Bar Tack the skirt right panel in place. I also tacked the left panel to the side seam. This helped me not show too much leg while just walking around. The choice is yours.


If you didn’t hem earlier, try on your dress and hem now!
The most time taken on this dress with be getting your skirt measurements, and figuring out your mesh pieces. Otherwise, it’s fairly straight-forward! I can’t wait to see your dresses – let me know your favorite velvet color in the comments! Mine are royal blue, burgundy, and black!


1 comment
Glenda Devage
Stunning!!!
Stunning!!!