White
White
 Pink
Pink
 Red
Red
 Orange
 Tan
Tan
 Beige
Beige
 Ivory
Ivory
 Yellow
 Gold
Gold
 Brown
Brown
 Green
Green
 Blue
Blue
 Purple
 Grey
Grey
 Black
Black
 Multi
Multi
 Abstract
 African Print
 Animal Print
 Baby & Nursery
 Buffalo Check
 Camo Print
 Celestial
 Church
 Damask
 Embroidered
 Floral
 Geometric
 Gingham Check
 Houndstooth
 Licensed
 Paisley
 Plaid
Plaid
 Polka Dot
 Sports
 Stripe
 Tie Dye

There have been claims that a silk pillow case can be a game changer when it comes to beauty sleep. Between preventing wrinkles in your skin and keeping your hair from breaking at the ends, it's worth a try!
Most silk pillowcases aren't cheap because the material itself is so expensive, but it's such an easy sewing project to tackle that you can easily cut the price in half. To make two pillowcases, you will use two yards of 100% silk fabric and two zippers. The pillowcase is a simple pattern using two rectangles that are sewn together on three sides and then connected with an invisible zipper. Because silk is so slippery, the pillowcase requires a zipper so it doesn't slide off of your pillow every night.
You might initially be hesitant about working with silk because it is such a slippery and delicate fabric, but as long as you install a new needle into your sewing machine at the start of the project, there is no reason a normal machine can't handle it! Let's get started!
Supplies:
- 2 yards White 100% Silk Fabric
- 20-inch White Invisible Zipper
- White Thread
- Sewing Machine + Invisible Zipper Presser Foot
- Seam Ripper
- Pins
- Measuring Tape
- Iron and Ironing Board
Time:
3-4 Hours
Difficulty:
Easy
LET'S GET STARTED!
-
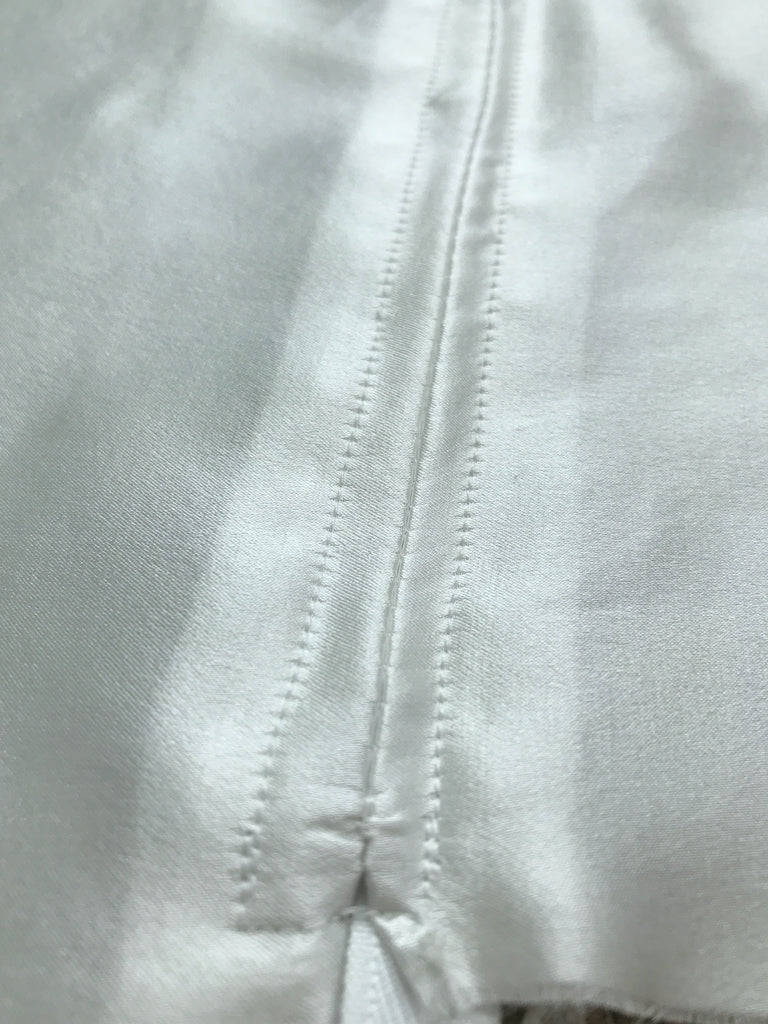
Cut your fabric into four rectangles 21" by 28". Start with one pillow by lying two of the rectangles on top of one another with the right sides of the fabric touching. Sew one of the short edges together 1/2" from the edge of the fabric with wide stitches.

-
Unfold the rectangles and iron them down away from one another. Take your zipper and pin it down on top of the area you just ironed with the invisible zipper side down facing the stitches. Using your invisible zipper presser foot, sew down the zipper through the two layers of fabric, turning the stitch and sewing over the ends of the zipper when you get to the end of the fabric.


-
Turn the fabric over so you can see the closed seam. Using a seam ripper, carefully rip out the threads covering the zipper to expose it. You will be left with a perfectly centered zipper.
-
To finish the pillow case, fold the fabric back again and line up the three remaining edges of the pillow case. Pin them together and sew around them once with a straight stitch and another time with a zig-zag stitch to keep the edges from fraying. Unzip the zipper and turn the pillowcase right side out.

- Repeat each of the steps again to finish a second pillow case. Slide in your standard pillows and enjoy a good night's rest!


This Tutorial was created by Julia Bleck of Bunny Baubles Blog