White
White
 Pink
Pink
 Red
Red
 Orange
 Tan
Tan
 Beige
Beige
 Ivory
Ivory
 Yellow
 Gold
Gold
 Brown
Brown
 Green
Green
 Blue
Blue
 Purple
 Grey
Grey
 Black
Black
 Multi
Multi
 Abstract
 African Print
 Animal Print
 Baby & Nursery
 Buffalo Check
 Camo Print
 Celestial
 Church
 Damask
 Embroidered
 Floral
 Geometric
 Gingham Check
 Houndstooth
 Licensed
 Paisley
 Plaid
Plaid
 Polka Dot
 Sports
 Stripe
 Tie Dye

Project Description
As of lately, there have been plenty of binge worthy TV shows! One of my favorites during 2020 was Bridgeton! Although the outfits weren’t period accurate, the attires that the entire cast wore was just too great to pass up. This is why, we will be making our very owned themed Bridgeton inspired outfit-as if we were made to be in the very show ourselves!
Supplies
Here's what you will need!
- McCall’s 8132
- 4 Yards of Pink Chiffon Fabric
- 4 Yard of Pink Crepe Back Satin Fabric
- 4 Yard of Ivory Poplin Fabric
- 14” Zipper
- 3 ¾” Buttons
- 5 Yards of lightweight interfacing
DIY BRIDGERTON INSPIRED OUTFIT
Dress
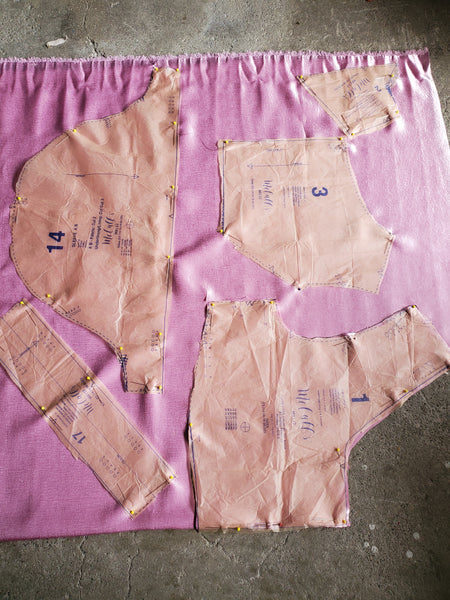
STEP 1
We’re going to start this tutorial off with the beautiful gown. First, using the satin fabric and cut out pattern pieces 1,2,3,14,17,19,20. Lay the garment pieces like shown above. Make sure for pattern piece “20”, we’re going to fold over the tail. However, when we use the same pattern pieces for the sheer fabric, we’re not going to fold over the tail. .


STEP 2
When cutting out the sheer and satin fabrics for pattern piece 20, we’re going to cut away at the stitching line like shown above. This is where the zipper is going to be later on! Make sure to hem the edges at ⅝”.
STEP 3
Next, we’re going to attach pattern piece 3 with two like shown above. After doing so we’re going to pin pattern 1, the front bodice, to the side bodice and the back. We’re going to pin at the shoulder and also on the side. Once pinned, sew together at ⅝”.


STEP 4
You’re going to repeat steps 1-3 for the sheer fabric. This step is for sewing together the sheer with the satin material together like shown above. Pin around the garment like so but leaving the bottom of the bodice open. This is where we are going to gather the fabric together. Sew together with the “right sides” facing each other. Once you sew around the garment flip it inside out.
STEP 5
This is just of me pointing where we are going to gather the fabric. Once you flip the garment inside out with the right sides facing towards you, we’re going to gather the bottom of the fabric. It should look just like the second photo.


STEP 6
Now onto the sleeves! Again we’re going to repeat the same process with the sheer fabric! Use pattern piece 14 as a guideline to mark three of the points like the photo above. We’re going to use this as a guideline to gather top of the sleeve. Once you marked the pieces with a pen or pencil, put the sheer fabric on top of the satin fabric and pin it like so. Then you will gather the top of the fabric.
STEP 7
This is just a small step for the cuffs of the sleeves for the dress. This is pattern piece 17. You’re going to cut a pair on the satin fabric and the sheer fabric, Once you cut it, we’re going to lay it on each other and fold! Once it’s folded we are going to attach it to the rest of the sleeves like shown above!


STEP 8
After sewing on the cuff and folding it over, it’s time to sew it onto the main bodice. Connect the darts from the sleeves to the main bodice and sew them together at ⅝”.
STEP 9
Alas, it is time for the skirt part of the dress! Lay pattern piece 19 and 20 flat on top of each other. Pin and sew the side of the fabrics like shown above on both sides!


STEP 10
After sewing the pieces together we’re going to gather the top of the fabric so we can attach it to the bodice. The second photo above is an example of what the gathering should look like.
STEP 11
After gathering the fabric all around it’s time to attach it to the bodice. Once the skirt is attached to the bodice, we’re going to sew on the zipper.


STEP 12
Now that the dress is finished, it’s time to move onto the jacket.
Jacket
STEP 13
Above are all the pattern pieces we will need for the jacket! Make sure you cut two pairs of pattern 26, the cuffs, and 24, the coat collar.


STEP 14
We’re going to start first on the main jacket. Put aside pattern pieces 21,22, 23, and 25.
STEP 15
Like we did in the earlier steps, we’re going to use the guidelines on the pattern to pin and mark with a pen or pencil on where to sew. On Bodice 21, we’re going to add three pleats. Carefully add dots on where the pins are at . After removing the paper pattern, we’re going to take our pen and connect the dots like shown in the second photo above. Once marking it we’re going to pin each of the boxes together and sew! Follow the lines that we just marked.


STEP 16
23 and 22. Now moving on to the jacket back. We’re going to connect pattern 22 with pattern 23. Similar angle/pinning to the dress bodice.
STEP 17
After Step B4 we’re going to pin and sew together the jacket bodice back with the front at the side and the shoulder.


STEP 18
We’re going to repeat step 6 for the jacket sleeve. Be sure to mark/ connect the dots so you have a line to follow when gathering.
STEP 19
This step is illustrating how to gather the top of the sleeve. Make sure you don't back stitch at the beginning and the end. We’re going to use the extra threat to pull the pieces together, hence gathering the garment.


STEP 20
Now we’re going to fold over the sleeve like shown above. Sew at ⅝”!
STEP 21
Now for the easy part, attaching the sleeve of the bodice! Connect the darts and ⅝”.


STEP 22
This is an illustration on how the garment should look like. After this step, we will moving onto the lining, which is a repeat of Steps B1-B9.After repeating the steps we’re going to attach the garment to the main jacket, With the “ Good side” of the fabric facing each other. Sew only in the front, instead of all around. Then turn the garment inside out.
STEP 23
After B10, we’re going to work on the collar, cuffs, and the waistline belt. Reminder to cut two pairs of the cuff, pattern 26, and another collar, pattern piece 24.


STEP 24
This is where The interfacing will play a part. We’re going to cut each of the pieces on the interfacing and iron them on-on the “bad side” of the fabric.
STEP 25
Now it’s time to pin and sew the interfacing/iron pieces together. Pin them like shown above and sew around at ⅝”. Once sewn, cut around the outside edges and cut the corners. Flip each of the garments inside out.


STEP 26
Now we’re going to sew on the collar of the jacket. We;re going to pin the collar like shown above on the inside of the jacket. We’re going to zig zag stitch all around the collar. Once you’re finished with the stitch, flip the collar over.
STEP 27
You’re going to repeat step B14 with the waistband as well! It should look like the photo above.


STEP 28
Similar to sewing on the collar from the inside of the fabric, we’re going to do something similar with the cuffs of the jacket. We’re going to pinthe cuff facing downward like shown above and zig zag stitch the cuffs to the sleeves.
STEP 29
After step B16, Flip the cuff up and it should look just like this.


STEP 30
Lastly, adding the buttons and buttonholes. Use the guidelines on pattern 21 and 27, to find where the button holes should lay! I think the waistline will be more cute with a second button so it can easily be adjustable. But it is completely optional! After you mark the button holes, use your sewing machine button maker to create the button hole.
STEP 31
This is what the final jacket product should look like!