White
White
 Pink
Pink
 Red
Red
 Orange
 Tan
Tan
 Beige
Beige
 Ivory
Ivory
 Yellow
 Gold
Gold
 Brown
Brown
 Green
Green
 Blue
Blue
 Purple
 Grey
Grey
 Black
Black
 Multi
Multi
 Abstract
 African Print
 Animal Print
 Baby & Nursery
 Buffalo Check
 Camo Print
 Celestial
 Church
 Damask
 Embroidered
 Floral
 Geometric
 Gingham Check
 Houndstooth
 Licensed
 Paisley
 Plaid
Plaid
 Polka Dot
 Sports
 Stripe
 Tie Dye

Project Description
Are you ready to save the universe after watching Doctor Strange in the Multiverse of Madness? Dr. Steven Strange is a superhero, and aside from his mystical powers, hypnotize others with his rich and vibrantly colored robe and cloak. Check out this Dr. Strange Robe & Cloak Costume Tutorial, to create your own Dr. Strange costume. Easy and fun, our Dr. Strange costume can be made with only a few items and is guaranteed to dazzle others at your next costume party, Halloween, or even when watching Doctor Strange in the Multiverse of Madness!
Supplies
Here's what you will need!
- McCall’s Costumes M7676 - Dr. Strange
- 4 Yards of Lino Italiano Fabric - Royal Blue
- 3 Yards of Lino Italiano Fabric - Navy Blue
- 4 Yards of Brushed Polyester Wool Coating Fabric - Burgundy
- 1 Yard of Church Cross Metallic Brocade Fabric - Red / Silver
- 4 Yards of Cotton Polyester Broadcloth (58/60”) Fabric - Wine
- 1 Yard of Ottertex® Marine Vinyl (54”) Solid Fabric - Black
- 1 Yard of Poly China Silk Lining (60”) Fabric - Midnight Blue
- 2 Yards of Fusible Interfacing Fabric
- Tailor’s Chalk, Matching Thread, & Hand Sewing Needles
- Sewing Machine
- Serger Machine (optional)
- 24" zipper
- Zip Ties
- Zipper foot
- Shoulder pads
- 1 14" zipper
- Hook and bar closures
- Clothes Iron
- D-Rings or O-Rings
- Leather bias tape or leather remnants
- Leather sewing machine needle
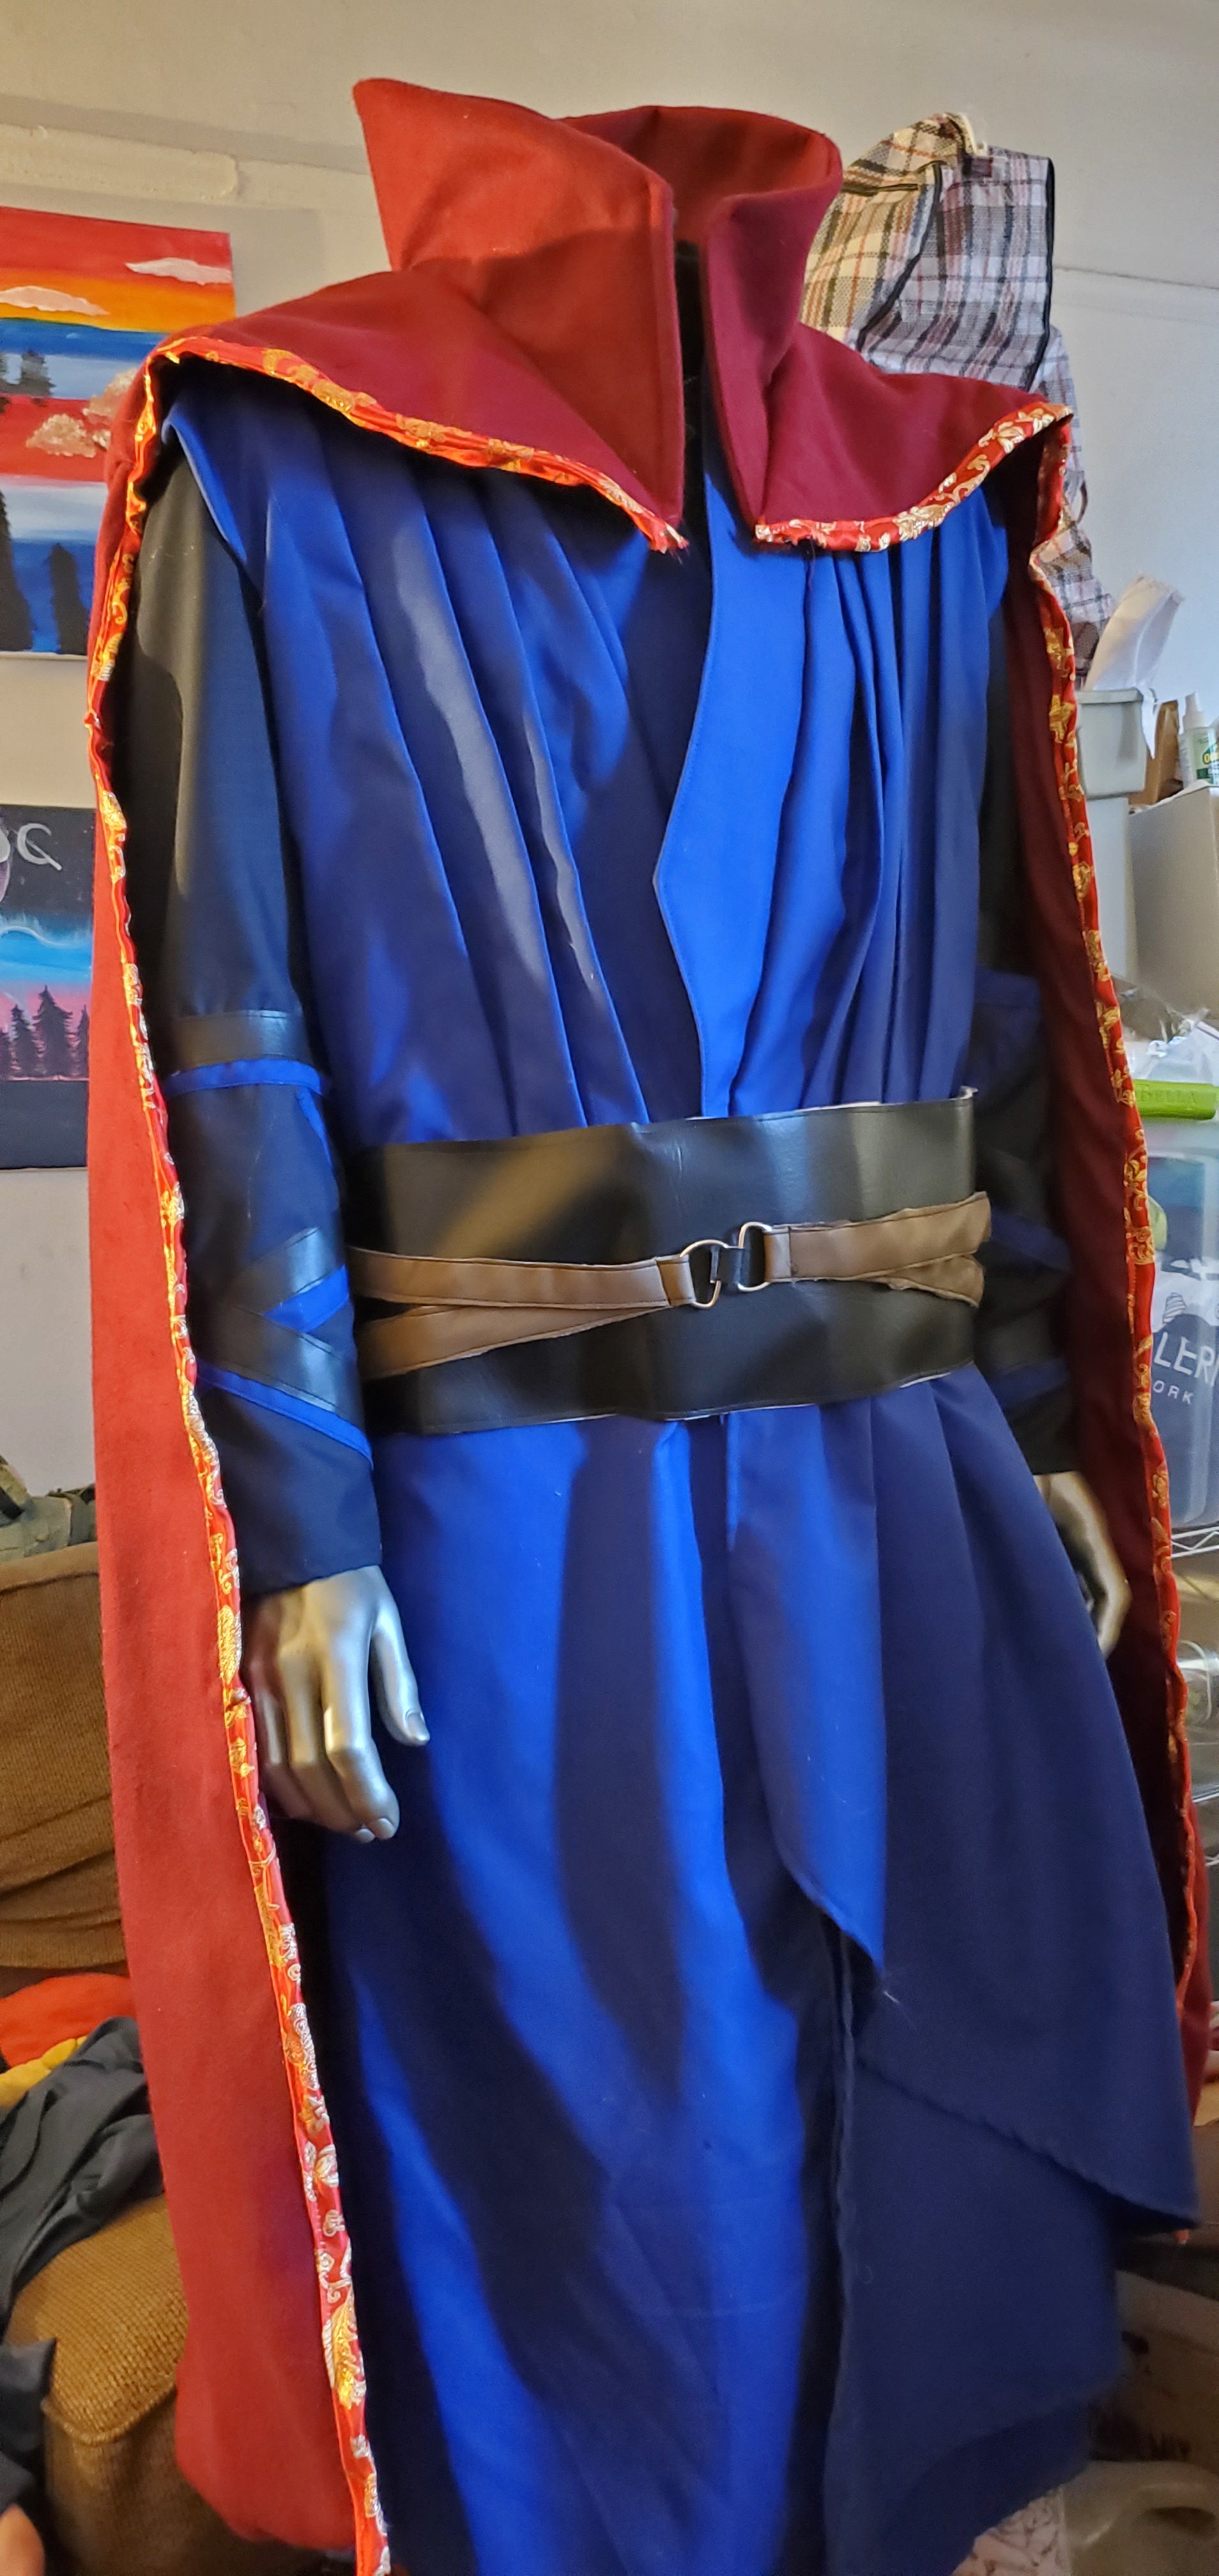

Dr. Strange Robe & Cloak Costume Tutorial
STEP 1 Cutting the Pattern
Using the McCall’s Costume M7676 template, cut out all 20 pattern pieces based on your measurements. Be sure to transfer all the pattern markings using the tailor’s chalk.


STEP 2 Create Pleats (Piece 1)
Create pleats on the outside of the upper front (Piece 1). Stitch along the stitching line using a 3.0” stitch length. Press the pleats with a hot clothes iron to keep them in place.
STEP 3 Reinforce The Edge
Reinforce the edge of the front overlay (Piece 2). Stitch through the stitching line that is marked on the fabric.


STEP 4 Make Rolled-Over Hem
Make a rolled-over hem on the sides and bottom edges of the front overlay (Piece 2) using a 3.0” stitch length.
STEP 5 Create Pleats (Piece 2)
Make pleats in the front overlay (Piece 2) using the same methods as Step 2. Baste the front overlay across the upper edge of the pleats.


STEP 6 Repeat Step 3
Repeat step 3 and reinforce the long edge of the front (Piece 3).
STEP 7 Repeat Step 4
Repeat step 4 and hem the edge of the left lower front, below the clip.


STEP 8 Pin Pieces 2 And 3
Pin the underside of the front overlay (Piece 2) to the right side of the lower left front (Piece 3), ensuring stitching lines match. Next, stitch to the large circle using a 3.0 stitch length. Turn the overlay on the seam and press it into place with a hot iron.
STEP 9 Repeat Step 7
Repeat step 7 on the lower right front.

STEP 10 Stitch Pieces 1 And 2
Stitch the top front and the lower front (Pieces 1 and 2) together using a 3.0” stitch length.
STEP 11 Pin & Stitch The Back Sections
Using a 3.0” length stitch, pin & stitch the back sections (Piece 4 ) together at the center back leaving an opening above the large circle marked on the pattern.


STEP 12 Open The Back Seam
Press open the back seam with a hot iron. Next, roll hem the raw edges of the back seams by using a 3.0” stitch length.
STEP 13 Stitch Vest Pieces
At the shoulder, stitch the front and back vest pieces together by using a 3.0” stitch length.


STEP 14 Stitch Vest Neck
Staystitch the opening of the vest neck edge, using a 3.0” stitch length.
STEP 15 Pin The Interfacing
Pin the interfacing to the underside of each band section (Piece 5) and baste it inside the seam allowances.

STEP 16 Stitch Band Sections At Center
For each band, stitch the 2 band sections together at the center back using a 3.5” stitch length.
STEP 17 Stitch Band Sections At Outer Edge
Stitch the band sections together along the outer edge using a 3.5” stitch length.


STEP 18 Press The Band
Turn the band right side out and press it with a hot iron.
STEP 19 Stitch Upper Edge Of Band
Topstitch the upper edge of the front band with a 3.0” stitch length.


STEP 20 Pin The Band To Vest
Pin and baste the band to front of the vest with hand stitching.
STEP 21 Stitch Back Lining
Stitch the back lining (Piece 4) together at center back using a 3.0” stitch length.


STEP 22 Make A Hem
Make a narrow hem at the lower edge of the back by using a 3.0” stitch length.
STEP 23 Turn Seam Allowance
Turn in the seam allowance on the lower edge, in front of the lining (Piece 6).


STEP 24 Stitch Lining Section
Stitch the lining sections together at the shoulder seams by using a 3.0” stitch length.
STEP 25 Pin Lining To Vest
With the right sides together, pin the lining to the vest over the band and stitch them by using a 3.0” stitch length.


STEP 26 Understitch Lining
Understitch the lining as far as possible. Turn the lining to the inside and press it with a hot iron.
STEP 27 Pin The Vest Pieces
Open out the lining and pin the front and back to the sides. Pin the front and back vest pieces at the sides and stitch them all with a 3.0” stitch length.


STEP 28 Insert Shoulder Pads
Take the shoulder pads and insert them between the vest and lining at the shoulder seams. Pin them into place and stitch them to the seam allowance.
STEP 29 Stitch Upper Front Lining
Slipstitch the pressed edges of the upper front lining to the waist seam.


STEP 30 Hem The Bottom Edge
Narrow hem the bottom edge of the vest by using a 3.5” stitch length.
STEP 31 Stitch Front Of Piece 7
Using a 3.0” stitch length, stitch the front of the tunic (Piece 7) together at the center front. Leave an opening above the large circle marked on the pattern. (Optional: Finish the edges with a serger to prevent fraying).


STEP 32 Pin The Zipper
Pin the zipper to the tunic front and stitch them together by using a 3.0” stitch length and a zipper foot on your machine.
STEP 33 Stitch The Zipper
Top stitch through the zipper’s thickness by using a 3.0” stitch length and your standard sewing foot.


STEP 34 Pin And Stitch Pieces 7 and 8
Pin and stitch the back and front (Pieces 7 and 8) at the shoulder and side seams.
STEP 35 Pin And Baste The Interfacing
Pin and baste the interfacing to tunic collar (Piece 9). Press up the notched edge of the un-interfaced collar.


STEP 36 Stitch Collar Section
Stitch the collar sections together by using a 3.0” stitch length and press them together.
STEP 37 Pin Collar To Neck Edge
Pin the collar to the neck edge of the tunic and stitch them together, keeping the pressed edge free.


STEP 38 Stitch Edges To Seam
Slipstitch the pressed edge of the collar over the seam.
STEP 39 Edgestitch The Collar
Edgestitch the collar along the seam by using a 3.0” stitch length.


STEP 40 Easestitch The upper edge Sleeve
Easestitch the upper edge of the sleeve (Piece 10), between the notches marked on the pattern.
STEP 41 Cut The Sleeve Trim
Cut the sleeve trim along with the cutting lines on the pattern (Piece 11). Press on only one edge of the sleeve trim with an iron.


STEP 42 Pin And Stitch The Sleeve Trim
With a 3.5” stitch length, pin and stitch the sleeve trim to the sleeve by following the pattern placement.
STEP 43 Switch Sewing Needle
At this point, switch your sewing machine needle to a leather needle. Using a 3.5” stitch length, stitch the leather trim into place over the contrast sleeve trim and repeat this step for both sleeves.


STEP 44 Roll Hem Lower Sleeve
Roll hem the lower sleeve edges by using a 3.0” stitch length.
STEP 45 Finish The Sleeves
Using a 3.0” stitch length, pin both unfinished sleeve, right sides together, and stitch them to form a finished sleeve.


STEP 46 Attach Sleeves To Tunic
Attach the sleeves to the tunic and stitch them together by using a 3.0” stitch length.
STEP 47 Roll Hem The Bottom Tunic Edge
Roll hem the bottom edge of the tunic by using a 3.0” stitch length.


STEP 48 Baste The Interfacing Pieces
Pin the interfacing to pieces 14, 15, and 16, and baste them together inside the seam allowance.
STEP 49 Stitch The Cape Backs
Using a 3.0” stitch length, pin and stitch the side back, and back of the cape together (Pieces 12 and 13).


STEP 50 Repeat Step 49
Repeat step 49 for the cape lining.
STEP 51 Pin Lining And Outer Cape
Pin the lining and the outer cape with their right sides together and stitch the lower edge.


STEP 52 Understitch The Lining
Understitch the lining of the cape by using a 3.0” stitch length.
STEP 53 Press And Baste The Cape Edges
First, turn the lining to inside. Next, press and baste the raw edges of cape together.


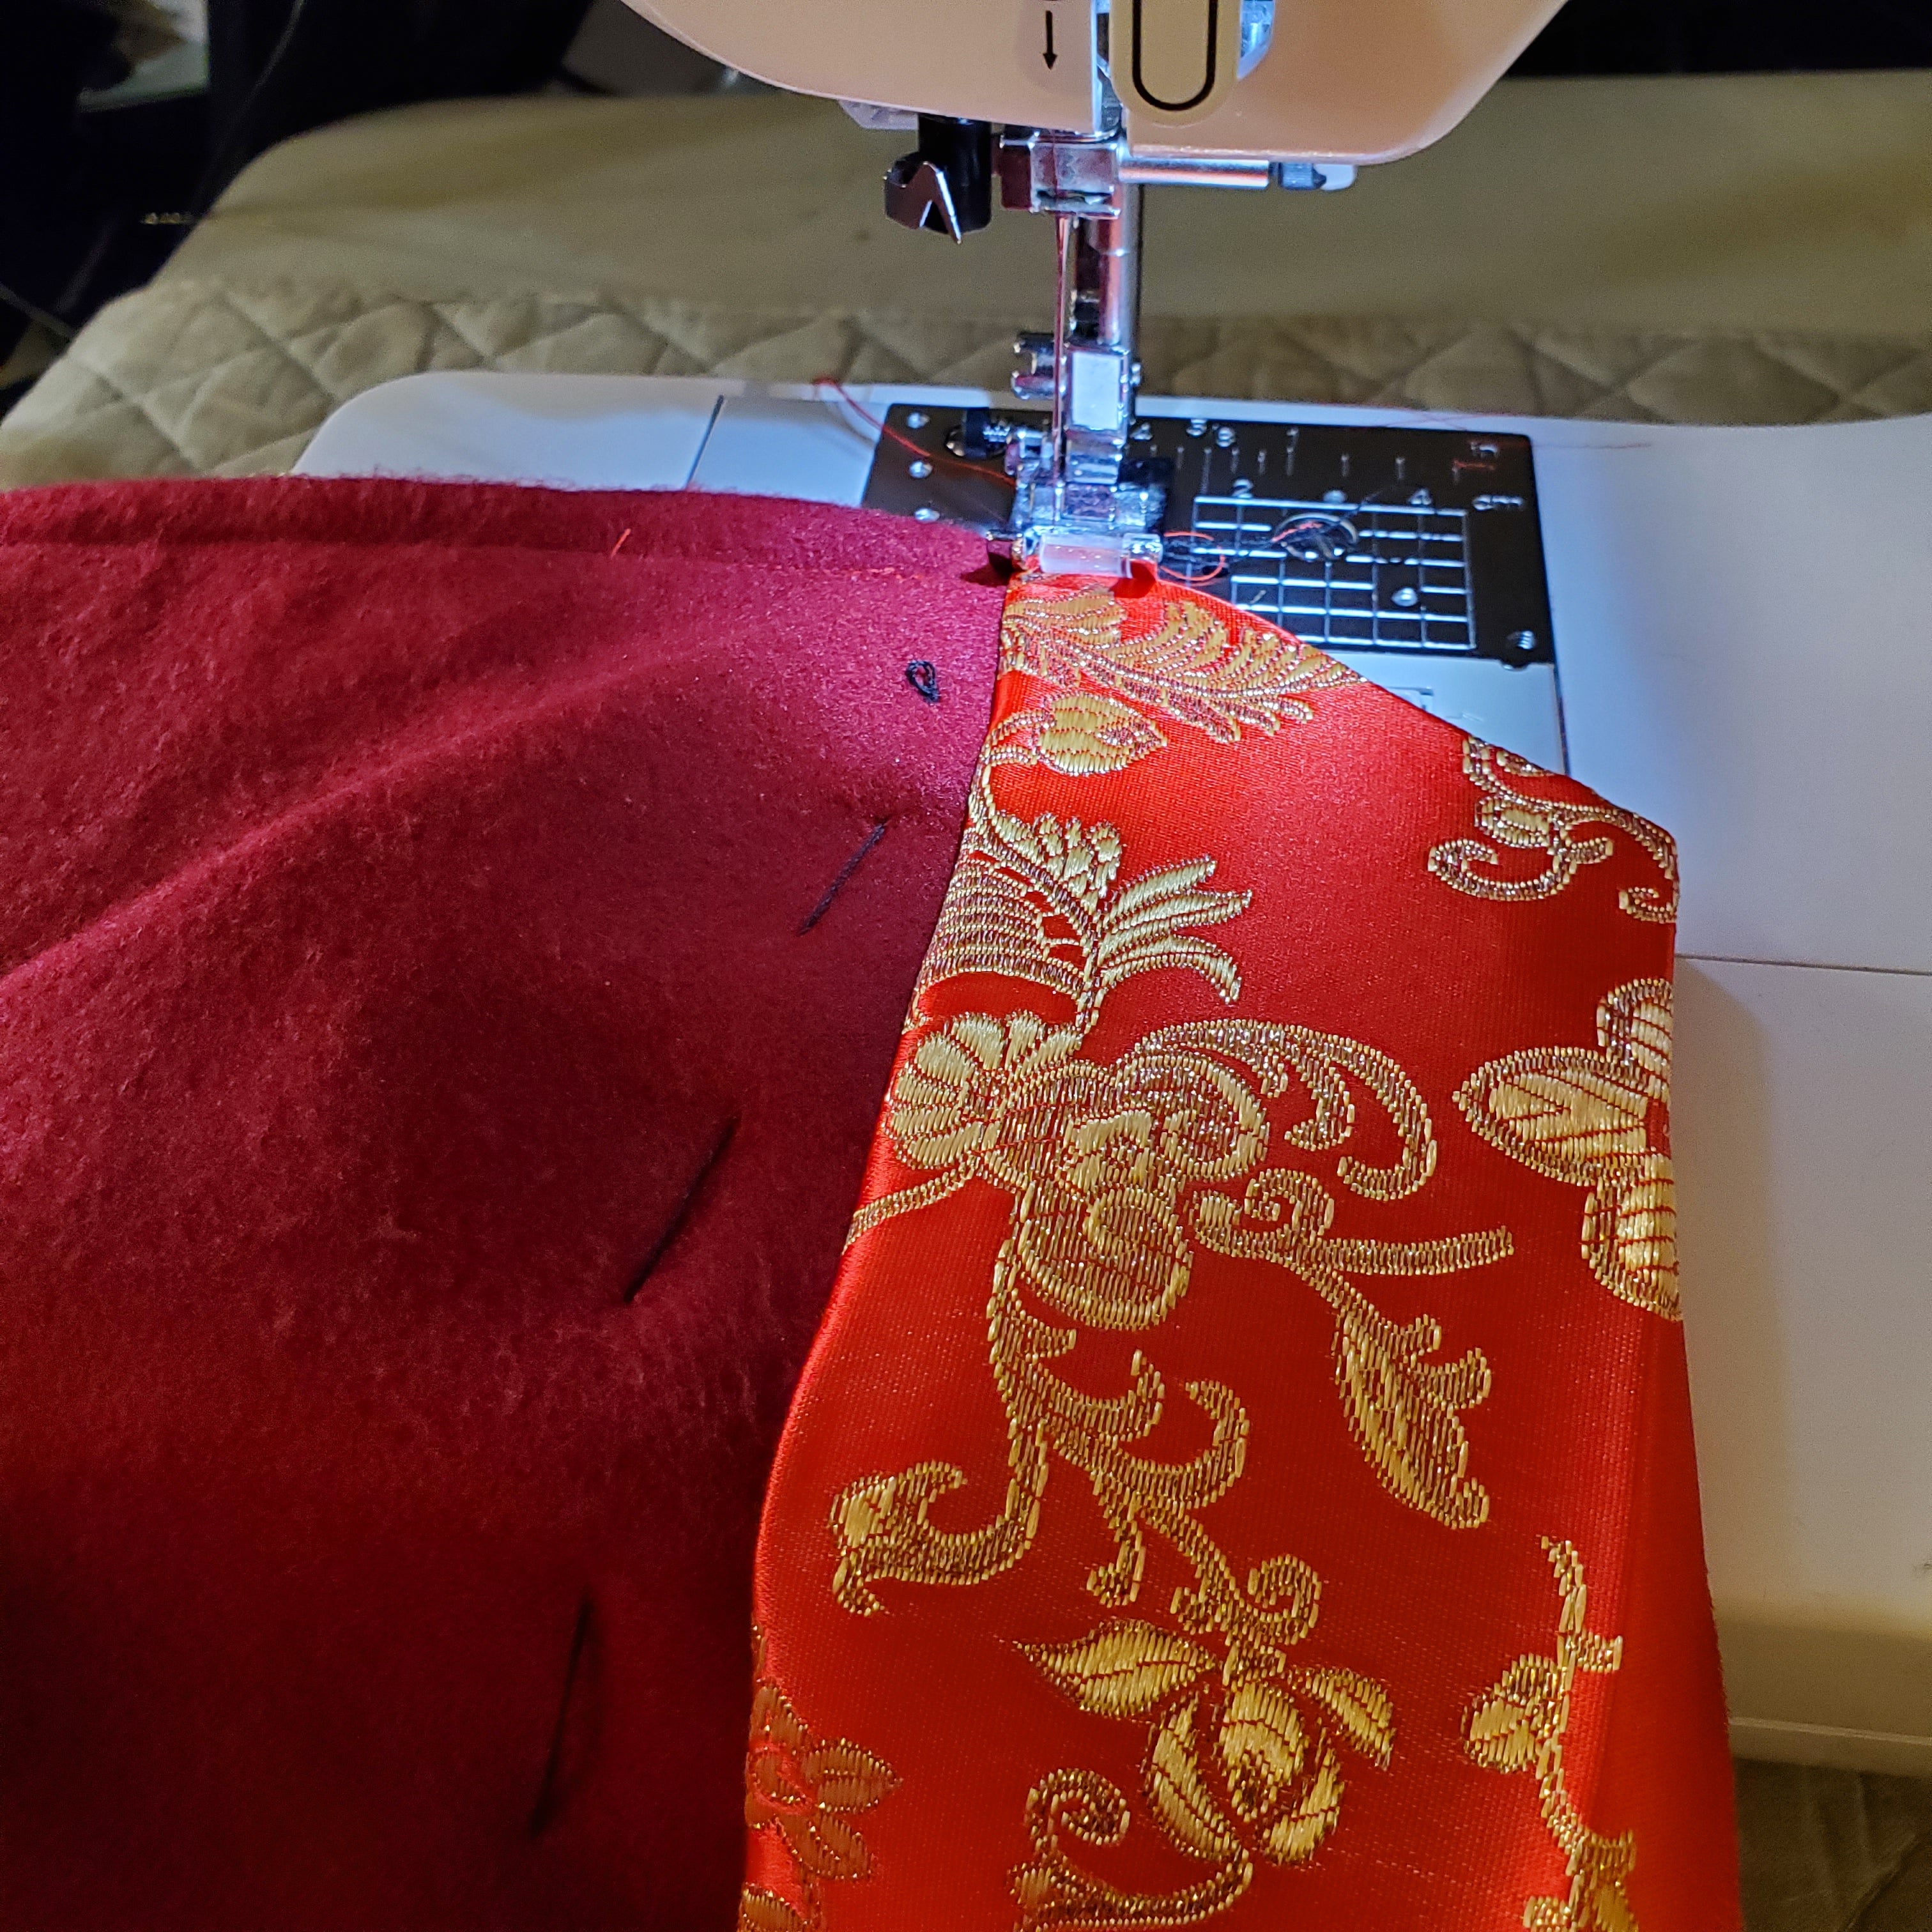
STEP 54 Stitch Collar Sections
Stitch the collar sections (Piece 14) together by using a 3.0” stitch length. Ensure that the notched edge is left open.
STEP 55 Mark Out Boning Channels
Turn the collar right side out and press it with an iron. Use pins to mark out boning channels in the fabric.


STEP 56 Sew Boning Channels
Sew the boning channels on cape collar and insert a zip-tie boning.
STEP 57 Baste Lower Edge Of collar
Now, baste the lower edges of the collar together.


STEP 58 Stitch Yoke Front And Back
Using a 3.0” stitch length, pin and stitch the yoke front and yoke back (Pieces 15 and 16) at the shoulders.
STEP 59 Stitch Neck Edge
Staystitch the neck edge of the yoke.


STEP 60 Pin Collar To Yoke Neck
Pin the collar to the yoke neck edge and baste edges.
STEP 61 Repeat Step 58
Repeat step 58 when stitching the yoke front and the back linings.

STEP 62 Iron The Sean Allowance
Turn in the seam allowance of the back edge lining and press it with an iron.
STEP 63 Pin And Stitch Lining To Yoke
Pin the lining to the yoke over collar, ensuring the ends match. Stitch the lining to the yoke over collar by using a 3.5” stitch length. Keep the pressed edge of the over collar free.


STEP 64 Stitch Lower Edge
Slipstitch the lower pressed edge, encasing the raw edges.
STEP 65 Stitch Upper And Lower Band
Using a 3.0” stitch length, stitch the upper band and the lower band together (Piece 17 and 18).


STEP 66 Press The Unnotched Edge
Press the unnotched edge of the bands with a hot iron.
STEP 67 Stitch Band To Cape
Pin the right side of band, to right side of the cape and stitch them by using a 3.0” stitch length. Understitch the band to the cape.


STEP 68 Stitch Ends Of Band
Turn the ends of the band down and stitch them by using a 3.0” stitch length.
STEP 69 Stitch Sew-in Interfacing
By using a 3.0” stitch length, Stitch sew-in interfacing to the underside of the belt (Piece 19)..


STEP 70 Stitch The Trim Using Rings
Using leather bias tape, slip each trim in between O or D-rings. Position the ring over the circle marked on the pattern. Now, stitch trim them together.
STEP 71 Attach Button And Eye Closures
Sew the button and eye closures to right side and underside of the belt.


STEP 72 Sew Hook And Bar Closures
Remove the basting stitches left in the costume. Now sew hook and bar closures on to the left and right front, and the left and right back collar of the vest. Repeat this process with the cape.
You have complete the Dr. Strange Robe & Cloak Costume! You are now ready to protect earth against magical and mystical threats. Did you enjoy this tutorial? Let us know in the comments below. Visit our online store, Fabric Wholesale Direct to shop fabric by the yard, and our Blog for fabric tutorials, informative articles, and SEW much more.